
As the title states, today you are going to let your little one poke out a letter using a toothpick.
Safety first on this one ya’ll…if you dont feel comfortable letting your little one use such a tiny, sharp tool, then use a pen/pencil even a mechanical pencil.
Nonetheless, you are going to use the “Tracing the alphabet” template from “Formation, Formation, Formation” to trace and then use a toothpick to poke through all the holes that make up the letters. This is a great way to reinforce the letter formation because children spend a lot of time concentrating on each letter so it really helps them to recall the letter forms in the future.
Make sure you talk about each letter so that they attach the letter name to its shape.
Environmental print Make a Book of Their World
In one of my earlier posts “Read the Playroom“, I briefly mentioned the suggestion of posting “environmental print” in the playroom. Environmental print is simply “print that we see in our everyday environment” such as signs, banners, billboards, logos, etc.
Today, I have a simple activity, but it may take a bit of time to collect.
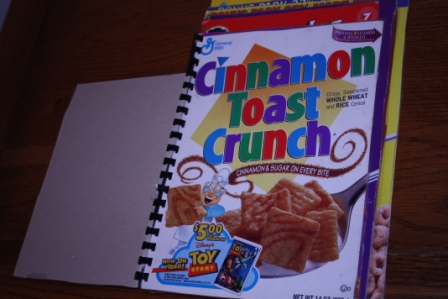
You are going to cut out the front of cereal boxes, snack boxes, and restaurant boxes/bags such as donut box tops or burger king bags. And you are going to combine them all to make a book for your child’s reading corner. If you dont have a reading corner, book display, bookshelf, or something like it. PLEASE consider establishing a designated area for reading. Make it cozy with bean bags, pillows, a little lamp, etc. You want this area to be one that your little one frequents.
I am posting the picture of my assembled book, but I was a teacher who “bound” the book at school. You can 3-whole punch it and use binder rings, stick it in a 3-ring folder or binder, put them in sheet protectors, or anything you can think of that align with the resources available to you.
Please e-mail me pictures of your completed work so I can post ideas for other moms and dads on the visitor share page 🙂
Remember, as mentioned in an earlier reading post, this doesn’t mean your child can read necessarily, but it is a great way to attach meaning to print, to reinforce that reading can be linked with picture clues, and to provide the repetition to introduce new reading skills such as phonemic awareness which I will address in detail later.
And remember that each time you cut out a new print to save it is an opportunity to teach about it….to talk about what it says, the letters in the word(s), the way that you can identify it, etc. Have fun!

Math on my Fingers
In the last math post “Math Stories” I talked about the importance of hands-on activities when introducing and practicing new skills. And in the post “What’s in a number?” I talked about children needing to see number sets represented in many ways. Today, we are going to combine those two important concepts in a counting activity using their fingers.
Search around your house for something that can fit on your child’s fingers (rings, finger puppets, those Halloween fake finger tips, cubes/blocks that are open on one side, etc.)
Make a group of ten finger-sized manipulatives and ask your child to help you count them out. Then explain to your little one that you want to play a game where you will call out a number and they will place that many cubes on their fingers (one on each finger) using both hands. Then you will ask them to show you that same number of cubes in a different way.
Before you play the game you have to show the child on your OWN fingers. This is important because in EVERY lesson, game, or activity you cant just tell your child what you are going to do…you have to 1) SHOW them. Then, you will 2) play it WITH them. Then you will just 3) TELL them.
This is the “I do”, “WE do”, then “YOU do” method to teaching that is really beneficial for the learner.
So, if I were playing this with my child, I would explain the game. Then I would tell them that if I said the number “3” out loud I would place the cubes on my “right hand thumb, left hand thumb, and left hand pointer finger” while I counted aloud: “One, two, Three” and then I would say “Now watch! I can put three cubes on my fingers in a different way…maybe I can put one on my right hand tall finger, stack one on top of that, and then put the other on my left hand ring finger. Do you have an idea of how I can place these three cubes in a different way on my hands? Show me! Can you show me on your fingers next? Let’s try a new number and we can both put that many cubes on our fingers and surprise each other to see if it looks the same or different. Okay! Now it is your turn to try it by yourself while I call out a number…..”
If you have any questions about this activity or any activity for that matter….

Shared Writing
If you read the post “Read the Playroom” you sat back and learned from your child’s abilities to “write.” Today, you are going to do the writing while your little one dictates/tells you what to write. This process is called shared writing and teachers use this all the time to model handwriting and introduce concepts of writing.
Put a poster on the wall at your child’s eye level and tell him/her that you want to make up a recipe together, maybe even one you could pretend to cook after. You need the titles Ingredients and Directions: Let your little one come up with the ingredients and the directions as you write them out. But the key here is to TEACH while you write. You are displaying their words for the household to see so you have that platform to teach while you model the writing process.
Teach them:
1) To start writing on the top, left side so that you will not run out of room. A lot of times I ask my students before I start writing “Should I start on this side (pointing to the right side)? What about down here? Why not?” to get them thinking about why we start writing at the top left.
2) To write one word at a time, leaving nice-size spaces between words.
3) To listen for the sound at the beginning of the words.
Each time you do a writing activity like this with your child, it instills a foundation of print concepts and extends their understandings each time.
I will talk about more print concepts to teach for the writing process in a future writing post.
introduce concepts of print ABC Match
Let’s do some more letter activities because the alphabet is a great way to introduce concepts of print in a systematic way.
Being able to read the alphabet aloud with a pointer, pointing to the correct letter and not zooming ahead or falling behind is a great milestone that represents your child’s understanding that print communicates something.
First, write out the alphabet in large letters / use the alphabet sentence strip poster you made for the post “Read the Playroom.” Lay it out on the floor.
Then, I want you to search around your house and find some alphabet pieces that your child can manipulate –like the foam ABC set for the bath, or the magnetic set you can buy at the dollar store, or puzzle pieces, whatever you have. And I want you to lay them all out on the floor in no particular order. Then I want you to tell your child that you want to put them in the order that we read them when we sing the ABC’s. In order to do this you are going to match the manipulative letter to the written letter. Each time you pick a letter….talk about it. Do you know this letter? Where is its place in the alphabet, the beginning, middle, or end? What letter does it come after/before?
If your child isn’t sure…sing the ABC song until you get to that letter; your little one will most likely act super excited that he/she “found it.”
If you want to accommodate to make the matching skill more difficult….draw the lower case of the alphabet and match the upper case to it.
