Year: 2011

September Weather Tracking!

I live in Baton Rouge, Louisiana so I am already experiencing Tropical Storm Lee and will be all weekend. 
Being that I am rained in, and thinking of all of the mommy teachers who might be, I decided to make a freebie for you this morning 🙂

September Calendar

If you like this template… you can buy the whole years worth HERE!

There are sooo many skills you can teach using a calendar, and this month specifically, try to focus on teaching calendar skills by making a “weather calendar.”  Just place the calendar on your fridge (or on display in the playroom), and ask your little one to help you be a weatherman (or woman) this month!

You can teach:

  1. prediction: “What do you think the weather will be tomorrow? What do you think the weather will be like later today with a dark, cloudy sky this morning?”
  2. patterns – “Do you see any weather patterns this week?”
  3. picture graph data – “How many sunny days have there been? How many rainy days?  Have there been more/fewer sunny days or rainy days this week/month? What kind of weather have we seen the ‘least’ of this month?”
  4. vocabulary – monday, tuesday, sunny, cloudy, most, least, etc.

Your little one’s calendar might look like this:

 or you might record the weather every morning and afternoon and in that case it will look different, but just do whatever is most age-appropriate for your little one… maybe your little one will only draw the pictures, maybe your little one will only write the “s” for sunny, and maybe your little one will only write the sight word.   But as always , make this experience fun for them.

Uses for a Picture Dictionary

Lately I have been staring at my little one’s picture dictionary and deciding that I am not going to let it collect dust when there ARE plenty of uses for them….no matter your child’s age!

In case you don’t believe me, I was sitting in the back seat with my 15 month old the other day and the only book I had in the back to get him out of his cranky mood was a picture dictionary that I bought at a garage sale.  SO, I decided, let’s practice his oral vocabulary and build on it a little. * I know I know….only a mommy teacher would think this way.  I picked it up, opened to a page with a few familiar images (ball, balloon, banana, etc.) and I started pointing and naming the images he knew with clear enunciation of each word – giving him enough time to repeat me.

He is really articulate for 15 months and has a great memory; so, I thought, hmm…I wonder how long I can make this last if I make a game out of it.
Starting with the pictures he knew, I asked him “Where is the ball?”  I watched his eyes search the page, and then, a light bulb went off!  He pointed to the ball and said “baaaaaaaaawwwwww” in the long, dragged out way he always says ball.  I was so proud, as every biased mother would be! We did this same routine for several other pictures that he knew, for about 10 minutes, and every time we repeated this process on a new page I would introduce one unfamiliar picture.

For those of you cheering “more more!” here are some more ideas:

1)   Have your little one use it as a research tool when they want to find out how to spell something “let’s find the picture under the letter that it starts with and see how it is spelled in a book!”

2)  Play “I spy” a picture that is made up of the sounds /b//e//d/ or /b/ /ed/

Or I spy a picture that has that word “at” in it’s name “bat!”

3)  Get ideas for a letter study….help your little one make a “B” (or any letter) poster and get ideas of what you might draw on the B poster from the picture dictionary.

4)  With your little one’s eyes closed, open the book and randomly place their finger on a picture, see if your little one can sound it out without looking at the word and then check the word beside the picture to see how many sounds “matched.”

Folder Finds…Trash or Treasure?

During the school year so many things come home in the back pack/folder; so many pictures are made just for you. This means that you have to choose whether you want a huge box full of papers to stash OR you can condense and keep a neat collection of work that shows growth over the course of the year.
One great way to display work your little one creates is to place the work in a sheet protector before putting it on the fridge. I know this seems overzealous but here is my reasoning:

 1) You can preserve their work.
2) When you are ready to put a new picture on the fridge, you can take the old one down and stick it right into a binder.
3) You show your little one that you really prize their hard work and display it proudly.

Here is how I decide what to display…. In the classroom, I encouraged little ones that the things that go on the “wall”:
1) Have meaning – they remind them of something.
2) Shows their best work – they put a careful, attentive amount of time into it.
3) May be unique – it is different in some way from other things saved in the binder.
4) Have added detail – has something extra special about it (a new word, a new attempt to draw something, etc.)

*Obviously, you don’t want to disqualify their work if it doesn’t meet the “criteria,” you just want to start talking to them about the work that is extra “fancy” and is unlike anything else they have ever done.
Last bit of advice:
Date it….you WILL forget and it makes it easier to organize when you have a timeline.

Discuss it….whatever your little one learned, bring it up again…reinforce that skill.

OR…. take a picture…. it lasts longer!

Here is an example of the sheet protector display that a classroom teacher and friend of mine, Taryn, uses for her precious little ones.  I thought you may want to “borrow” this look (contruction paper-backed sheet protector) for your fridge or make a mini display board to hang across from your pantry:

Now it’s your turn…..for a “mommy share” question:
** How do you choose which artwork you display & how do you display it?**
If there is enough of a response and enough good ideas I am going to condense them and put them into a post for all mommy teachers to benefit from. And I’d love for you to share pictures on the mommy teacher facebook page.

Even When School Starts, You are Still a Mommy Teacher

Hey, Mommy Teachers! It’s Casey, stopping by from Kidspired Creations! Well, this week ended an era for me as my oldest son, James’, primary teacher because he started Pre-K on Monday! I have been flooded with crazy emotions: sad that my baby is all grown up, ecstatic that I will only have 1 kid at home during the day, tired because this is the first time we have had to use an alarm in the mornings, excited to hear about all of his new adventures and friends, nervous that he’ll make poor choices without me, proud that he’s made amazing choices so far, giddy when the teacher tells me how smart he is, overwhelmed with the thought that he will now be in school until his mid-twenties at least, blessed when I pick him up and he runs to me saying, “I love you, Mommy!” and PUMPED when he complained, “Mommy, where’s my homework?

…WAHOO! I’M STILL A MOMMY TEACHER!
I realized that I can still be a Mommy Teacher even though James is in big boy school now! I must have known this earlier because I bought him a few school supplies for his 4th birthday in July (even though his school only requires him to have 1 folder and a blanket for nap time). As soon as he got home he went straight to his cool school kiddie corner to grab his notebook and pencil case. He asked me to make him some homework (here is where I started beaming :-D).

4 times each because he’s 4 years old. His rule.

1st Day
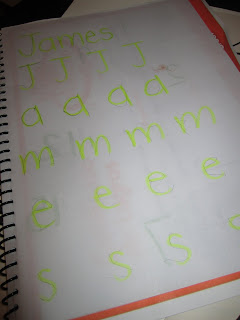
Looking through his art that his teacher sent home from school on the first day, I noticed that she had written his name on top of each paper with a highlighter and someone had traced his name with a pencil. I say someone because it was way too neat to be my son. Maybe the teacher helped guide his hand when tracing, but it was just way too neat. So I decided the first thing on our homework agenda was to practice writing his name.

As you can see, I wrote his name in highlighter, and he traced it. To teach him to always write from top-bottom, left-right, I sometimes had to draw a dot where he was supposed to start, and a dot where he was supposed to stop and pick up his pencil. This is a great way to teach directionality and print awareness. As you can see, he needs a little help working on writing dark enough. Putting pressure on his hands to show him how hard he was supposed to press helped, but writing lightly is a hard habit to break.

Next it was time to do some math! James has been dying to use his new super cool Cars ruler and he finally got his opportunity. He already understands that “inches” is a form of measurement and he constantly “measures” things in inches: “Mom, my foot is 18 inches!” “Mom, my scooter is 20 inches.” “Mom, this blanket is one hundred and ninety hundred and one thousand inches.” So I decided to shake things up a bit and teach him the difference between inches and centimeters.

I drew several lines of different lengths and he had to measure them using the centimeters side of the ruler. Then I drew the number he gave me using the highlighter and he had to trace it. (Very important to measure the lines first and make them have a length that comes to an exact whole number.) And guess what? Even in math we still practiced fine motor skill development (handwriting), directionality, and print awareness (again) in addition to measurement and number recognition.

Oh, and for every answer he got right, he got a piece of candy. It was snack time, after all, and my kids found my secret stash of candy, so we all 3 dove in! (Please don’t judge, my kids rarely eat candy, but as soon as they found my favorite candy, well, I wanted it too). It really made it exciting for him when he got the answer right or traced a letter well.

2nd Day

James has NEVER been enthusiastic about writing, drawing, or coloring. So when he comes home from school EXCITED to do homework, I definitely don’t want to make it too boring for him. So since we practiced his name yesterday, today I had him just work on one letter. Naturally, I chose the letter Aa.

He traced the uppercase “A” four times, lowercase “a” four times, then came up with four words that start with an A. He came up with “alligator, apple, and & ant.”

For Math we learned about squares and rectangles. He was able to tell me the difference between the two but he couldn’t describe WHY they are different.

Me: “Now how many sides does a square have?”
James: “1, 2, 3, 4.”
Me: “And how many does a rectangle have?
James: “It has 4 too!”
Me: “So if they both have 4 sides, how are they different?”
James: “Hmmm that’s a good question, Mom.”

So we took out our favorite school tool, the ruler, again. He measured the sides of the square and the sides of the rectangle and was then able to tell me the length of the sides.

James: “This one is 2 and 2 and 2 and 2 inches and this one is 2 and 2 and 6 and 6 inches!”

Then it clicked… * “Oooooh the rectangle has two sides that are longer!” Now he has the language to describe why one shape differs from another which is a higher-order thinking skill: he isn’t just understanding that there is a difference between the shapes, he is analyzing WHY the two are different. Then he got to draw his own rectangle and his own square from memory.

We also incorporated what we learned about the letter “Aa” by searching, identifying, circling and tracing the letter in each of the words square and rectangle.

So, on DAY 2 we covered letter recognition, phonemic awareness, fine motor skill development (writing), print awareness, directionality, shapes, measurement, and language development.

3rd Day
Well, with school comes germs, so we are home sick. New emotions: frustrated that we didn’t even last a whole week without catching somebodies ickies, and very snuggly, if snuggly was an emotion.

Still wearing his sticker he got from school yesterday.

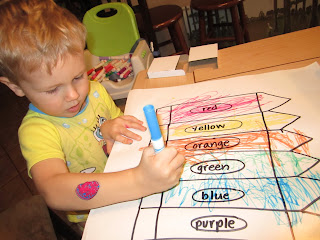
However, as soon as my youngest went down for a nap, James pulled out his school supplies… this time his markers. I drew several over-sized crayons onto paper and wrote different color names on them. James then had to sound out each of the words: “/r/ /e/ /d/… RED!” and then he had to find the red marker to color the red crayon. “/y/ /e/ /l/ /l/ /o/ /w/ Yelulahwuh! YELLOW!” Yup, a little trickier since the sounds changed up at the end. “/o/ /r/ /a/ /n/ /g/ /e/… um… what does THAT say?” Haha that one can trip anyone up! Here’s where we had a mini-lesson: “James, the letters o and r together say /or/. Can you think of a color that starts with /or/?

Was the goal of this lesson to get James to sound out each word? No. The reason is that most of these words break the standard sound rules that he knows. This was a step in being able to recognize these sight words, words that we know how to read because we have memorized the shape the words make, and not by sounding them out. He was also able to learn to use reading clues to help him guess the word. “What color starts with /g/ and ends in /n/?” By modeling these types of questions for kids, they will learn to do the same thing when reading, or when solving problems in general!

So what’s next on our homework agenda? Well, when more school work comes home I may get a better idea on what they are learning day-to-day, but for now, we will continue to work on the rest of the alphabet (both letter names and sounds) number recognition, making patterns, rhyming, language development, fine motor skill development (writing, using scissors, playing with play dough), measurement, compare/contrast and more!

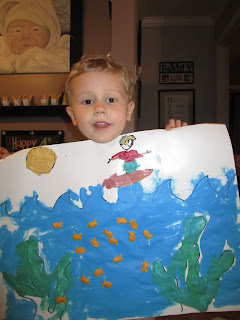
And we’ll definitely work on drawing…

“We are in a rocket ship.” Apparently.
For a look at Louisiana Grade Level Expectations (GLEs) for Pre-K:
From the Louisiana Department of Education
For more about my adventures raising 2 boys, please visit my personal blog
“My Kidspiration: A Tale of 2 Kiddies”
And for more about Kidspired Creations:

Exercise For Your Active Learner!

I talk to a lot of parents of very “active” children who have a hard time getting their little one to sit still long enough to hold a pencil.  But there are so many different ways to incorporate movement into your little one’s learning because there are so many skills to learn that can be meaningfully integrated into activities that require ACTION:

1) learning letters:

2) listening and following directions: dancing along to songs like Shari Sloane’s “Funky Chicken Boogie”

3) numbers: hopscotch!

4) shapes: shape marching

5)  positional words: exercise videos! (my nieces following along with a workout video 🙂

And there are so many more! Feel free to e-mail me if you would like an idea of how you might make a new skill for your little one come alive through movement!

Related Posts Plugin for WordPress, Blogger...

1 6 7 8 9 10 32