Preschooler

Easter Fun Focusing on Jesus

Hi Mommy Teachers!  I hope you all enjoyed a fabulous Easter!  Many of you may have kids on Spring Break now, or perhaps your Spring Break was last week like my oldest’s was, or if you don’t get a Mardi Gras holiday like we do in Louisiana, yours may have been several weeks ago.  Or if you don’t have a child in school, then perhaps every week is Spring Break… or not.  What is a break when you’re a mom anyway?

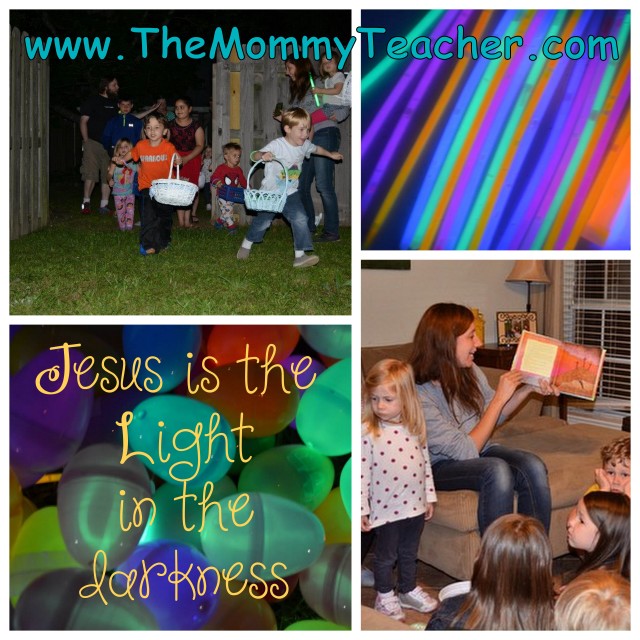
Easter was so much fun this year for my family!  The night before Easter, our family had our 4th Annual Glow-in-the-Dark Easter Egg Hunt with friends!  While I read from our Jesus Storybook Bible about Jesus’ crucifixion, burial and resurrection, the dads threw hundreds of glow-in-the-dark eggs in the field.  Jesus is the light in the darkness…great reminder!

Easter

This year, for our egg hunt on Easter morning, we decided to hide 12 Scripture Eggs, or Resurrection Eggs.  We followed the guidelines from Your Homebased Mom’s post for the Easter Scripture Egg Activity.  She shares a list of items/symbols to include in each of your eggs to have a visual element to better connect to each scripture, the twelfth egg being empty to represent the empty tomb. Her post also includes a PDF that you can print out with each of the scriptures on it.

I know that this post is after Easter, but I wanted to share with you how we adapted wonderful activity to our family and how my kids processed it.  Be sure to pin it to your Easter and Holiday Pinterest boards for next year!

www

My kids are 7, 5 and 2 and so I decided to hide three sets of Scripture Eggs to avoid a huge fight over who gets to learn about Jesus ;-).  I used 12 blue, 12 green, and 12 pink eggs and each of my kids knew which color they were searching for.  My kids each got a symbol in their eggs, but I rotated which kid got the scripture reference in his/her egg.  My husband had an New International Version (NIV) Bible open (or you can search for your favorite translation online) because the King James Version (KJV) can be confusing for the kids.

The kids were instructed to find the eggs, but not to open them.  When all the eggs were found, we sat down together and opened one egg at a time in order.  I loved hearing my 7-year-old say, “Hey!  There’s nothing in my 12!” and then the light bulb went off seconds later, “Oooooh because the tomb was empty!”

symbols

The whole family really did enjoy this activity! There was a bigger purpose and defined focus for what each egg represented than years past when we filled the eggs with candy… and even my 2-year-old caught on.  When my oldest was joking around like they do on VeggieTales saying, “Easter is for chocolate bunnies,” my 2-year-old was the one who corrected him, “No, Easter is for Jesus!”

Easter win!

Oh, and here’s a Mommy win for egg dying…

tongs

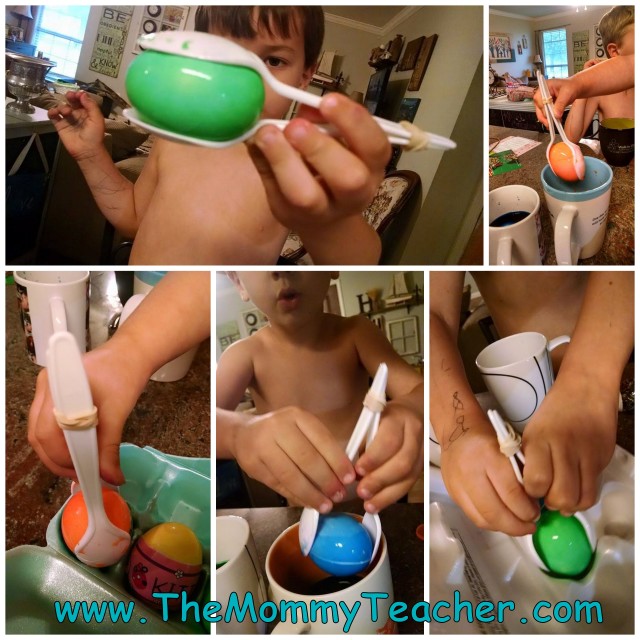
I call them “egg tongs.”  You’re welcome 😉

Remember to Pin this for next year!

How Does Your Garden Grow? 5 Garden Activities

banner

Last Mother’s Day, my kids gave me a great planter for us to start a home garden!

970018_10102217913375845_1261013702_n My husband works at a factory and they frequently get shipments of equipment that come in these long crates that are perfect for starting a garden (especially because they are free).  Keep your eyes peeled for wooden crates and pallets and you can get free planters as well!

This year we have a few more!

10251951_10103298616323475_9182112865024686846_n

Now, this is a little intimidating for me because I do NOT have a green thumb… but my husband is a little bit better at watering…and my kids are REALLY good at watering… a little too good as they sometimes over water.

So many early childhood teachers will grow plants in the classroom for kids to learn the parts of the plant, how to care for a plant, and what plants need to grow: soil, water, sun.  Here are a few activities for you to do at home to teach your kids about growing plants if you have or plan on starting your own garden at home.

1.  Journal:  Have your kids document plant growth.

  • Pre-schoolers – model drawing sketches of what your plants look like each week and then give them a crayon for them to do the same (may not look like much, but they will at least think they are drawing a plant).  Introduce vocabulary such as plant, green, grow, sun, soil
  • Pre-K – have them add words to their drawings (even if their words are just a mix up of letters – write what they are trying to spell underneath).  Vocabulary:  the name of the plants, ex: bell peppers, parts of the plant
  • Kinder – write a sentence or two describing the plant.  Vocabulary and discussion:  the name of the plants, ex: bell peppers, parts of the plant, why plants are important
  • 1st grade and above – a paragraph (minimum) documenting any changes they may see, how long they watered, what time of the day they watered, etc.  Vocabulary and Discussion:  the name of the plants, ex: bell peppers, parts of the plant, describe why plants are important, how they reproduce, nutrition and the benefits of eating home grown foods

2.  Predict:  Have your kids predict what is going to happen throughout the summer with their plants, use your journal from above to help document, then calculate results by a certain date at the end of the summer.

  • Calendar Math:  Using a summer calendar, mark the day you plant your plants.  Have your kids each choose a different date in which they predict they can start picking their ripe produce.
  • Measuring:  Using a ruler, guess the size of the produce and how tall the plants will become by the end of the summer.  Have them draw this out on poster paper to compare at the end of the summer.
  • Counting:  Predict the amount of produce each type of plant will produce.
  • Science – Weather:  predict the number of rainy days versus sunny days
  • Comparison:  predict what type of plant will produce the biggest/smallest, most/least amount, greenest, etc. produce

3.  Experiment:  Get several seedlings that are the same type and are all similar in size.  Experiment with different amounts of sunlight or soil type or watering schedule (choose one) to see what is the optimal amount for that particular plant.  Plant several seedlings in each of the different conditions to get the best average outcome.  And, go back to the first activity:  journal 🙂

4.  Create a Cookbook:  As your plants are growing, decide as a family what you are going to use your plants for and create a family cookbook together!  Take pictures of your growing plants to include in the “ingredients” section of each recipe.

BONUS:  Include a raw versus cooked taste test of each fruit/vegetable to include that 5th sense that we often don’t get to use in a classroom.

5.  Dissect the Plants:

  • Science:  learn about the different plant parts including the parts you don’t see… inside the stem, the roots, inside the fruit and flowers.  When you are finished, use the roots, stem, leaves, flowers to make art on a poster board.
  • Math:  Compare/Contrast the different types of plants:  length, leaf shape, fruit, root length and thickness and number of roots
  • Art:  Create leaf prints by placing a piece of paper on top of the leaves and using the edge of a crayon to etch the shape of the leaf.  Draw the type of produce next to each leaf.

BONUS:  One of my friends started a private Facebook group for some of her friends who wanted to start a home garden.  On it we are sharing pictures and knowledge with each other and when the produce is ripe, we will be having garden picking parties!  It is nice to see what everyone else is growing (and these ladies know way more than I do about gardening so it’s helpful too)!  I encourage you to start a similar group for your friends with green (or slightly unripened) thumbs.

It is so wonderful seeing how excited my kids are to watch our plants grow!  Right now, we just have bell peppers and cherry tomatoes, but we hope to fill our other planters soon!

Leyson and I tore a paper plate in half to draw our measurements of the peppers (paper plates are sturdier than sheets of paper thus easier to measure the peppers on).  We used a marker to draw a line on each side of the paper and later use a ruler to measure from line to line.  We numbered our peppers 1, 2 and 3.  Measure them week by week so you can see how much they grow in one week.

IMG_20140512_113850497

IMG_20140510_191016269 IMG_20140510_190829946

IMG_20140510_191123344_HDR

How does your garden grow???  How have you involved your children in your garden?

We are Thankful for…

Last week, I had the extreme privilege of subbing for my son’s 1st grade classroom for the afternoon.  This Mommy Teacher really misses the classroom so I was really excited to jump back in… if only for a little over 3 hours.

Well, it just so happened, that I had planned a Thanksgiving craft with my kids that evening, so I decided to bring some supplies and do it with James’ class, too… after all, this was one of my favorite activities to do in my own classroom each November…

I spoke to the kids about the month of November and it being a time to give thanks.  I explained what thankfulness is and gave some reasons about why I was thankful.  I then had each of the students say one thing that they were thankful for… guiding those who couldn’t think of something new.  My favorite?  “I am thankful for opportunities to be helpful,” referencing the different tasks the classroom helpers rotate each week. (And, of course, James being thankful for his mom ranks pretty high, too!)

I cut feathers out of construction paper and gave 3 to each student.  The students had to come up with 3 things they were thankful for and write each on one of their feathers.   At the end of our activity, we glued the feathers down and had a beautiful turkey!  It gave James a great picture of what our own finished turkey would look like after 28 days…

That’s right, we are taking the whole month to make our turkey… two feathers at a time (one for each of my boys).

Day 1:  James (6) is thankful for his little sister, and Leyson (4) is thankful for, well, Leyson!  Since we are a few days into November, use your first day you do this activity to play catch up to get the kids used to talking about things they are thankful for.

One thing I am thankful for?  All of our wonderful mommy teachers out there!  Thank you for stopping by The Mommy Teacher!  Please share your Thanksgiving crafts with us on Facebook!

UPDATE:  This is Jessica (The not-artsy Mommy Teacher) wanting to share the printable I made tonight so that I could do this tomorrow.  This is for the UN-artistic people who want to do this 😉 – (cough cough) namely for me and my kids !

Turkey Template

Click here: Turkey Template Printable to get the simple turkey template for this activity  OR click on the image above! 😉

Make My Pumpkin

In the spirit of Halloween, I wanted to do an art project with my 4-year-old while my 6-year-old was at school.  My middle child loves and cherishes this one-on-one time with Mommy.  Jess’ post on Monday inspired us to make our own Jack-O-Lanterns, but I had a different objective in mind.

I was also inspired by a “find the differences” book I was reading with Leyson that has two near-identical pictures side by side, but with subtle differences.  Each page asks you to “find (x-amount of) differences” which may be as simple as the omission of an object in the picture or a change of color, shape, size or placement of an object.

The objective of our activity was for my son to be able to both point out and fix the differences between my picture and his picture to make them the same, and also to recreate the picture I created… in this case, a pumpkin.

Materials needed:  construction paper, scissors, maybe some glue after the activity 🙂

IMG_20131021_085715_381

Mommy Prep:  Using orange construction paper, I cut out two large pumpkin shapes, and lots of different sized rectangles*, triangles, circles, squares and other various shapes with brown, yellow and black paper.

*I cut out 4 different types of rectangle stems to bring in some vocabulary to our activity:  short, long, thick, thin

IMG_20131021_085735_081 Leyson first had to close his eyes (or cover his face with a blanket because I learned that I can’t trust him to keep his eyes closed) and count to twenty while I arranged the different shapes to make a face on my pumpkin.  Apparently, counting to twenty now means omitting numbers 14 and 19, so we will be working on that again soon.

I started off with a simple face.  Two circles for eyes, a circle for a nose, a fat, brown rectangle and a U-shape for a smiley mouth.


When he got to 20, he pulled the blanket off of his face, he had to use the remaining shapes to make his pumpkin look just like my pumpkin.

IMG_20131021_085825_458

To make the project more challenging in other rounds, I layered some of the shapes such as using smaller circles on top of larger circles for the eyes.

The most difficult part of the activity was when I used only triangles to make a face and he had to figure out which direction the triangles were facing.  It’s harder than it looks!

IMG_20131021_091203_570

We experimented with all the different things we could learn from making pumpkins:

  • Feelings/Emotions: We made happy pumpkins, and sad pumpkins, and angry pumpkins, and scared pumpkins… and talked about why each pumpkin was feeling the way they were feeling.

IMG_20131021_090120_123

  • Counting/More or Less:  Sometimes Mommy’s pumpkin had 4 teeth, sometimes it had more or less.
  • Compare and Contrast:  “What is different about the nose on your pumpkin and the nose on my pumpkin?”  “Do our pumpkins have the same shaped mouth?”
  • Vocabulary:  Colors, shapes, sizes, parts of the face
  • Spacial Awareness:  “Are the eyes close together or far apart?”  “If you put the eyes in the middle of the pumpkin, can we fit a nose and a mouth too?”
  • Phonemic Awareness & Writing:  We segmented the sounds in pumpkin /p/ /u/ /m/ /p/ /k/ /i/ /n/… which is pretty hard to do when your child pronounces it like “po’kin” but we wrote the real word on the back of our project.

IMG_20131021_093142_009

When you are finished the activity, grab some glue so you can add some Halloween decor to your house!

IMG_20131021_092154_790

IMG_20131021_105651_367

Who needs to buy decorations from the store, when with a little glue and tape you can make your house ready for any holiday?!

Learning to Think: “What’s More Important?”

My kids often do things that are expectedly unexpected (if that even makes sense).  If I tell my kids to do something and they have a reaction that I didn’t anticipate, it is unexpected… but since it happens every single day a bajillion times a day… really… how unexpected can it be?  Expectedly unexpected.

Expectedly unexpect this, kids:  MY reaction to above situation.  I get annoyed.  Punish.  Yell.  Throw a Mommy hissy fit if it is the umpteenth time I have told them to turn off the TV.  Put the kids in timeout.  Take away the TV for the day.  Talk talk talk talk talk about how they disobeyed.  Seriously, you’d think they’d learn.  You think, I’d learn.

Well, I had this re-epiphany the other day.  A re-epiphany is that ‘aha’ moment that has been tucked away in our heads.  Sometimes we just need a little reminder.  And here is my re-epiphany… I need to teach my kids HOW TO THINK!

Pre-Re-Epiphany:

Me:  “It’s time to get dressed…”

Yet they continued to play with toys.

Me:  “C’mon boys, let’s get dressed.”

Nothing.

Me:  “Stop playing with toys and get dressed!”

Yeah, I’m not proud of those moments when I snap.  So, I have recently started turning the conversation around by verbally thinking about and questioning the situation to give them a chance to make the correct decision about what is the important thing to do to accomplish a task.

Post-Re-Epiphany

Me:  “It’s time to get dressed.”

They continue to play with toys.

Me:  “We need to get to school on time, so which is more important right now:  playing with toys or getting dressed?

Boys:  “Getting dressed.”

Me:  “What happens if we play with toys instead of getting dressed?”

Boys: “Then we are going to be late for school…”

and my little one added: “Then Mommy will be maaaaad.”

Yup… I guess I needed this little epiphany to get myself to chill out because fussing at my kids apparently sticks in their little minds.

I have been focusing my conversations with the kids on using guiding questions to help them discern how to behave.  The things that you and I as adults do automatically in our heads do not come naturally to young kids, but we can teach them the thought process that needs to be going through their minds.  We can verbally model that for them so they start doing it as well:

Is this the right thing to do?

Which is more important?

What would happen if I didn’t listen?

This type of teaching will help your kids learn how to think things through.  If you notice, I talked about our goal:  to get to school on time.  Then I narrowed down the field of all of the possible things they could be doing right now to two things:  playing with toys (the action they are doing) and getting dressed (the action I need them to be doing.

I then ask “What is more important right now?”  The right now is important because we do not want them to think that the things that matter most to them aren’t important, but at that exact moment, which is the MOST important.  With my 3-year-old, I sometimes also have to say, “We can play with our toys after homework today when it is play time,” to remind him that his own personal goal (to play with toys) will also be fulfilled, but at a later point today.

We have used this approach for many things this week – most of them have been in the format of prioritizing which activity will best help us to reach our goal.

Teaching how to think is cross-curricular.  You already teach foreshadowing (what’s going to happen next) in reading and math (sequencing) and cause and effect in science.  This is just taking the same conversational approach and applying it to behavior.

I recommend also having these conversations during regular play, not just when you need them to do something.  Expect the unexpected.  Try to anticipate how they might do something that you will have to fuss them for and start a conversation about it before it happens…

Mommy Teacher: “If we are going to play in your room which is next to your sleeping sister’s room, is it more important to talk loudly or quietly?”

Child:  “Quietly.”

Mommy Teacher:  “Why do we need to talk quietly?”

Child:  “Because we do not want to wake Sister up.”

And if you’re like me and have a little lawyer or politician on your hands who will try to argue his decision to choose to do something besides what you need him to do, just remind him to think about what is MOST important to accomplish the end goal.

Related Posts Plugin for WordPress, Blogger...

1 2 3 6