Meaningful Chores

Simple Chore Chart Checklist – Tidying !

I would classify myself as a “clean as you go” mom.  I am NOT a clean freak but I do like a tidy house.

I play with my kids and I pick up after my kids (admittedly)  a lot.

With three under three, tidying up after my little tornadoes is an ongoing discipline.  But as I approach the ages of chore-chart readiness I wanted to give my little ones a bit of familiarity with the responsibilities they can handle, and those that are age-appropriate.

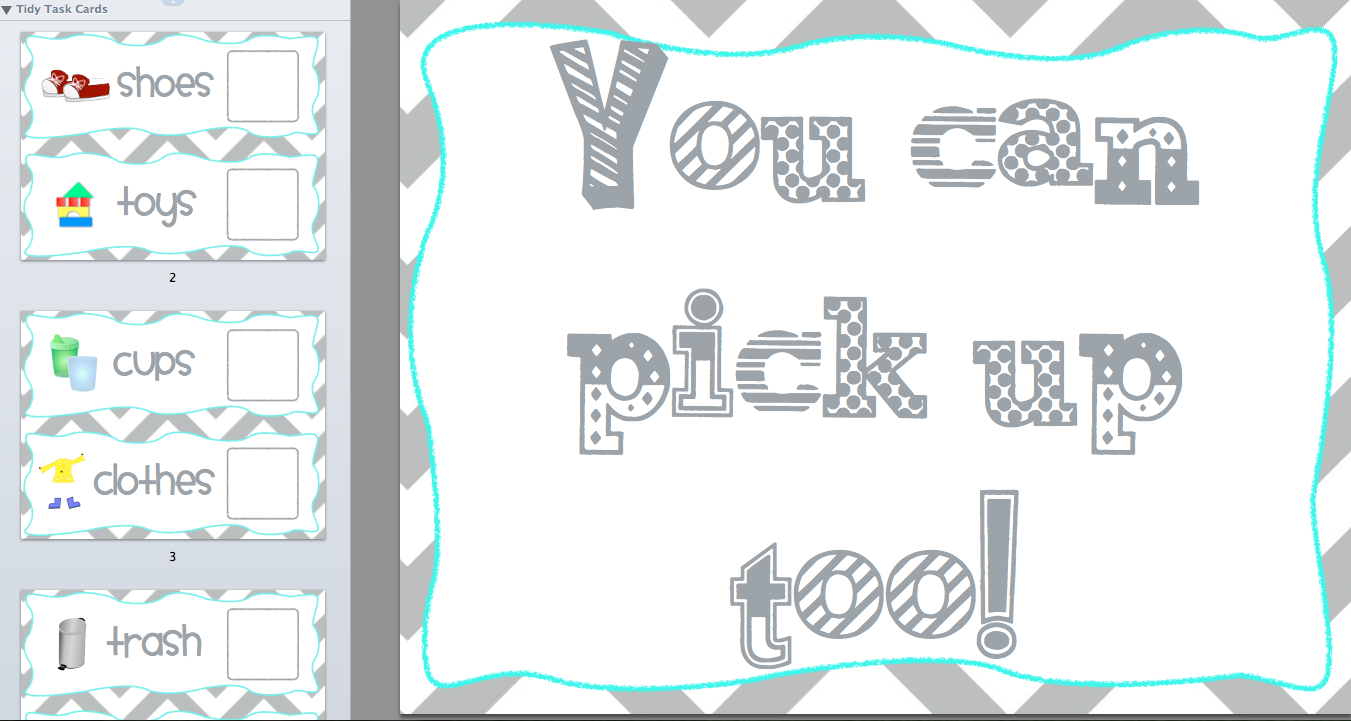
So, I made a simple checklist of the things that I would like them to be responsible for…. to pick up:

Shoes (We have a shoe basket)
Toys (Toy Chest)
Cups (Sink)
Clothes (Hamper)
Trash (Can)
Books (Book Bin)

chore checklist

I printed my checklist two per page and then laminated it (I have an affordable self-laminator from Walmart) and put this on our fridge with a square of small stickers held by a magnet nearby.

I introduced this checklist by saying that from now on when we are responsible and pick up after ourselves we get a sticker for each thing we pick up.  Then we picked up one of each item and put it where it goes, getting a sticker for each one.

Sticker  Checklist
Letting him take the sticker off helps develop his fine motor skills!

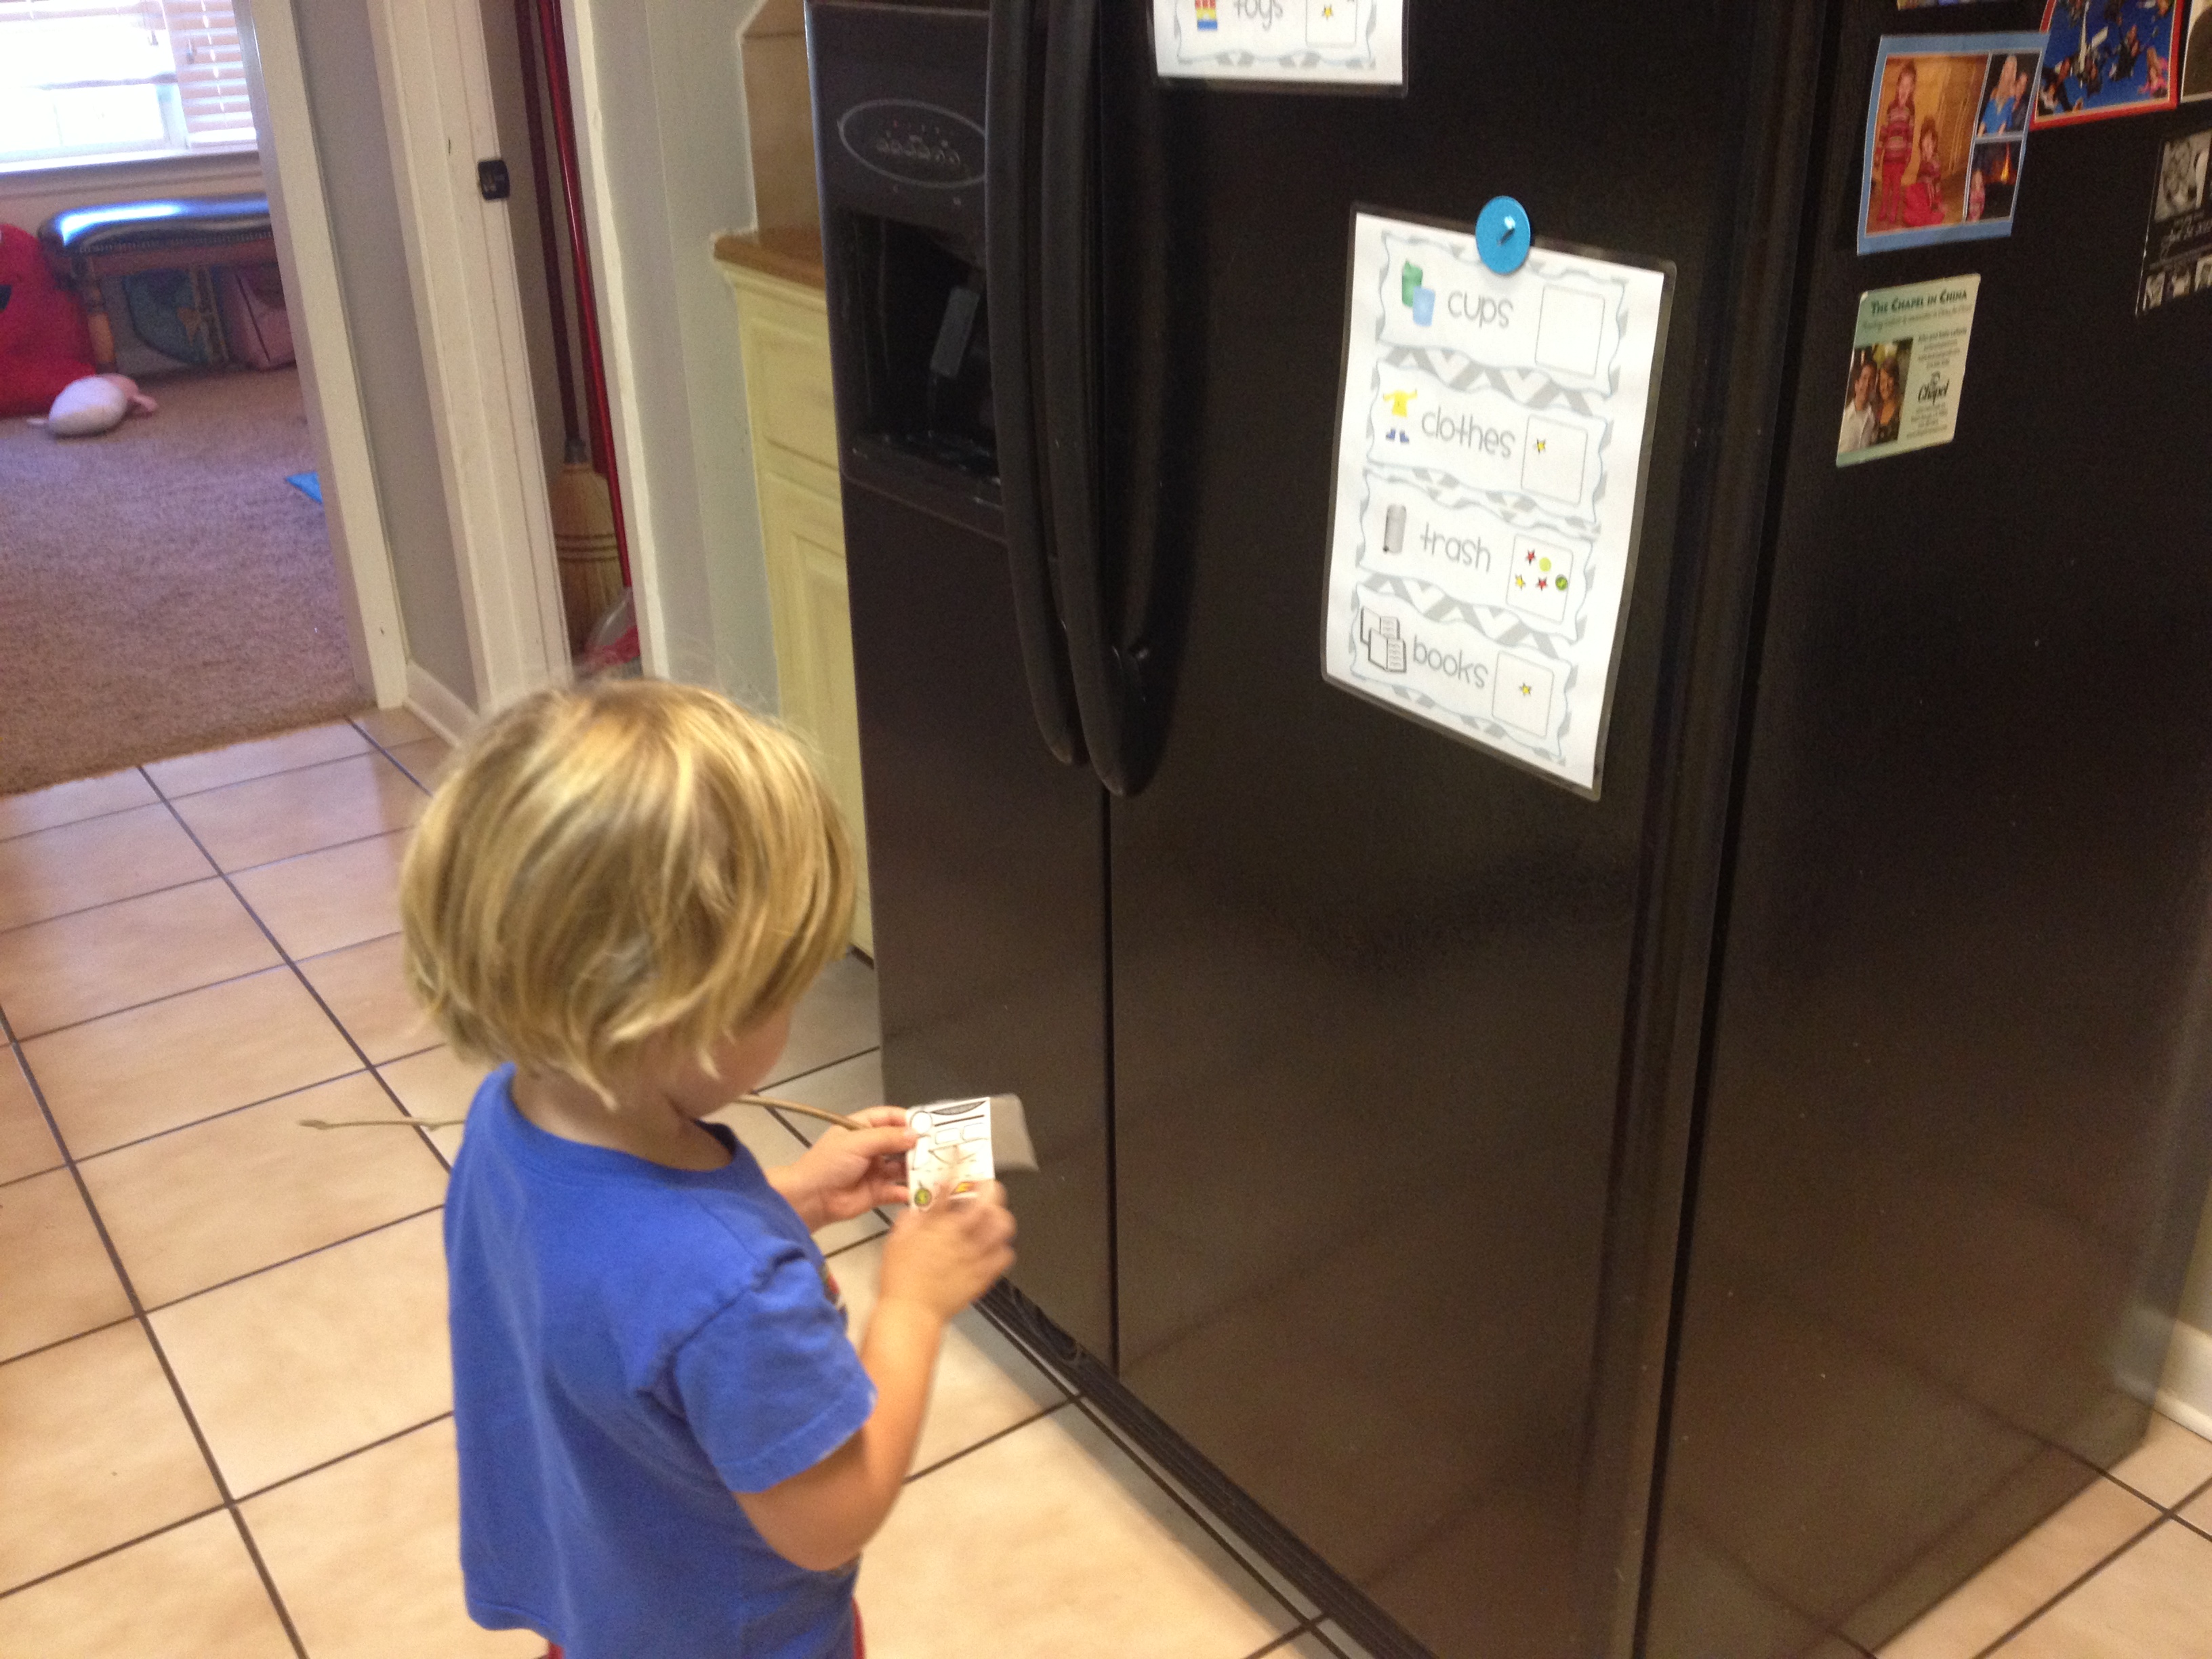
Now every time my kids pick up and put away something I give them a sticker to put in the box beside the chore.  I give my kids stickers now even if I encourage them to clean by singing or ringing a bell… not just if I “catch” them cleaning, but if they do it without me asking I give them two.

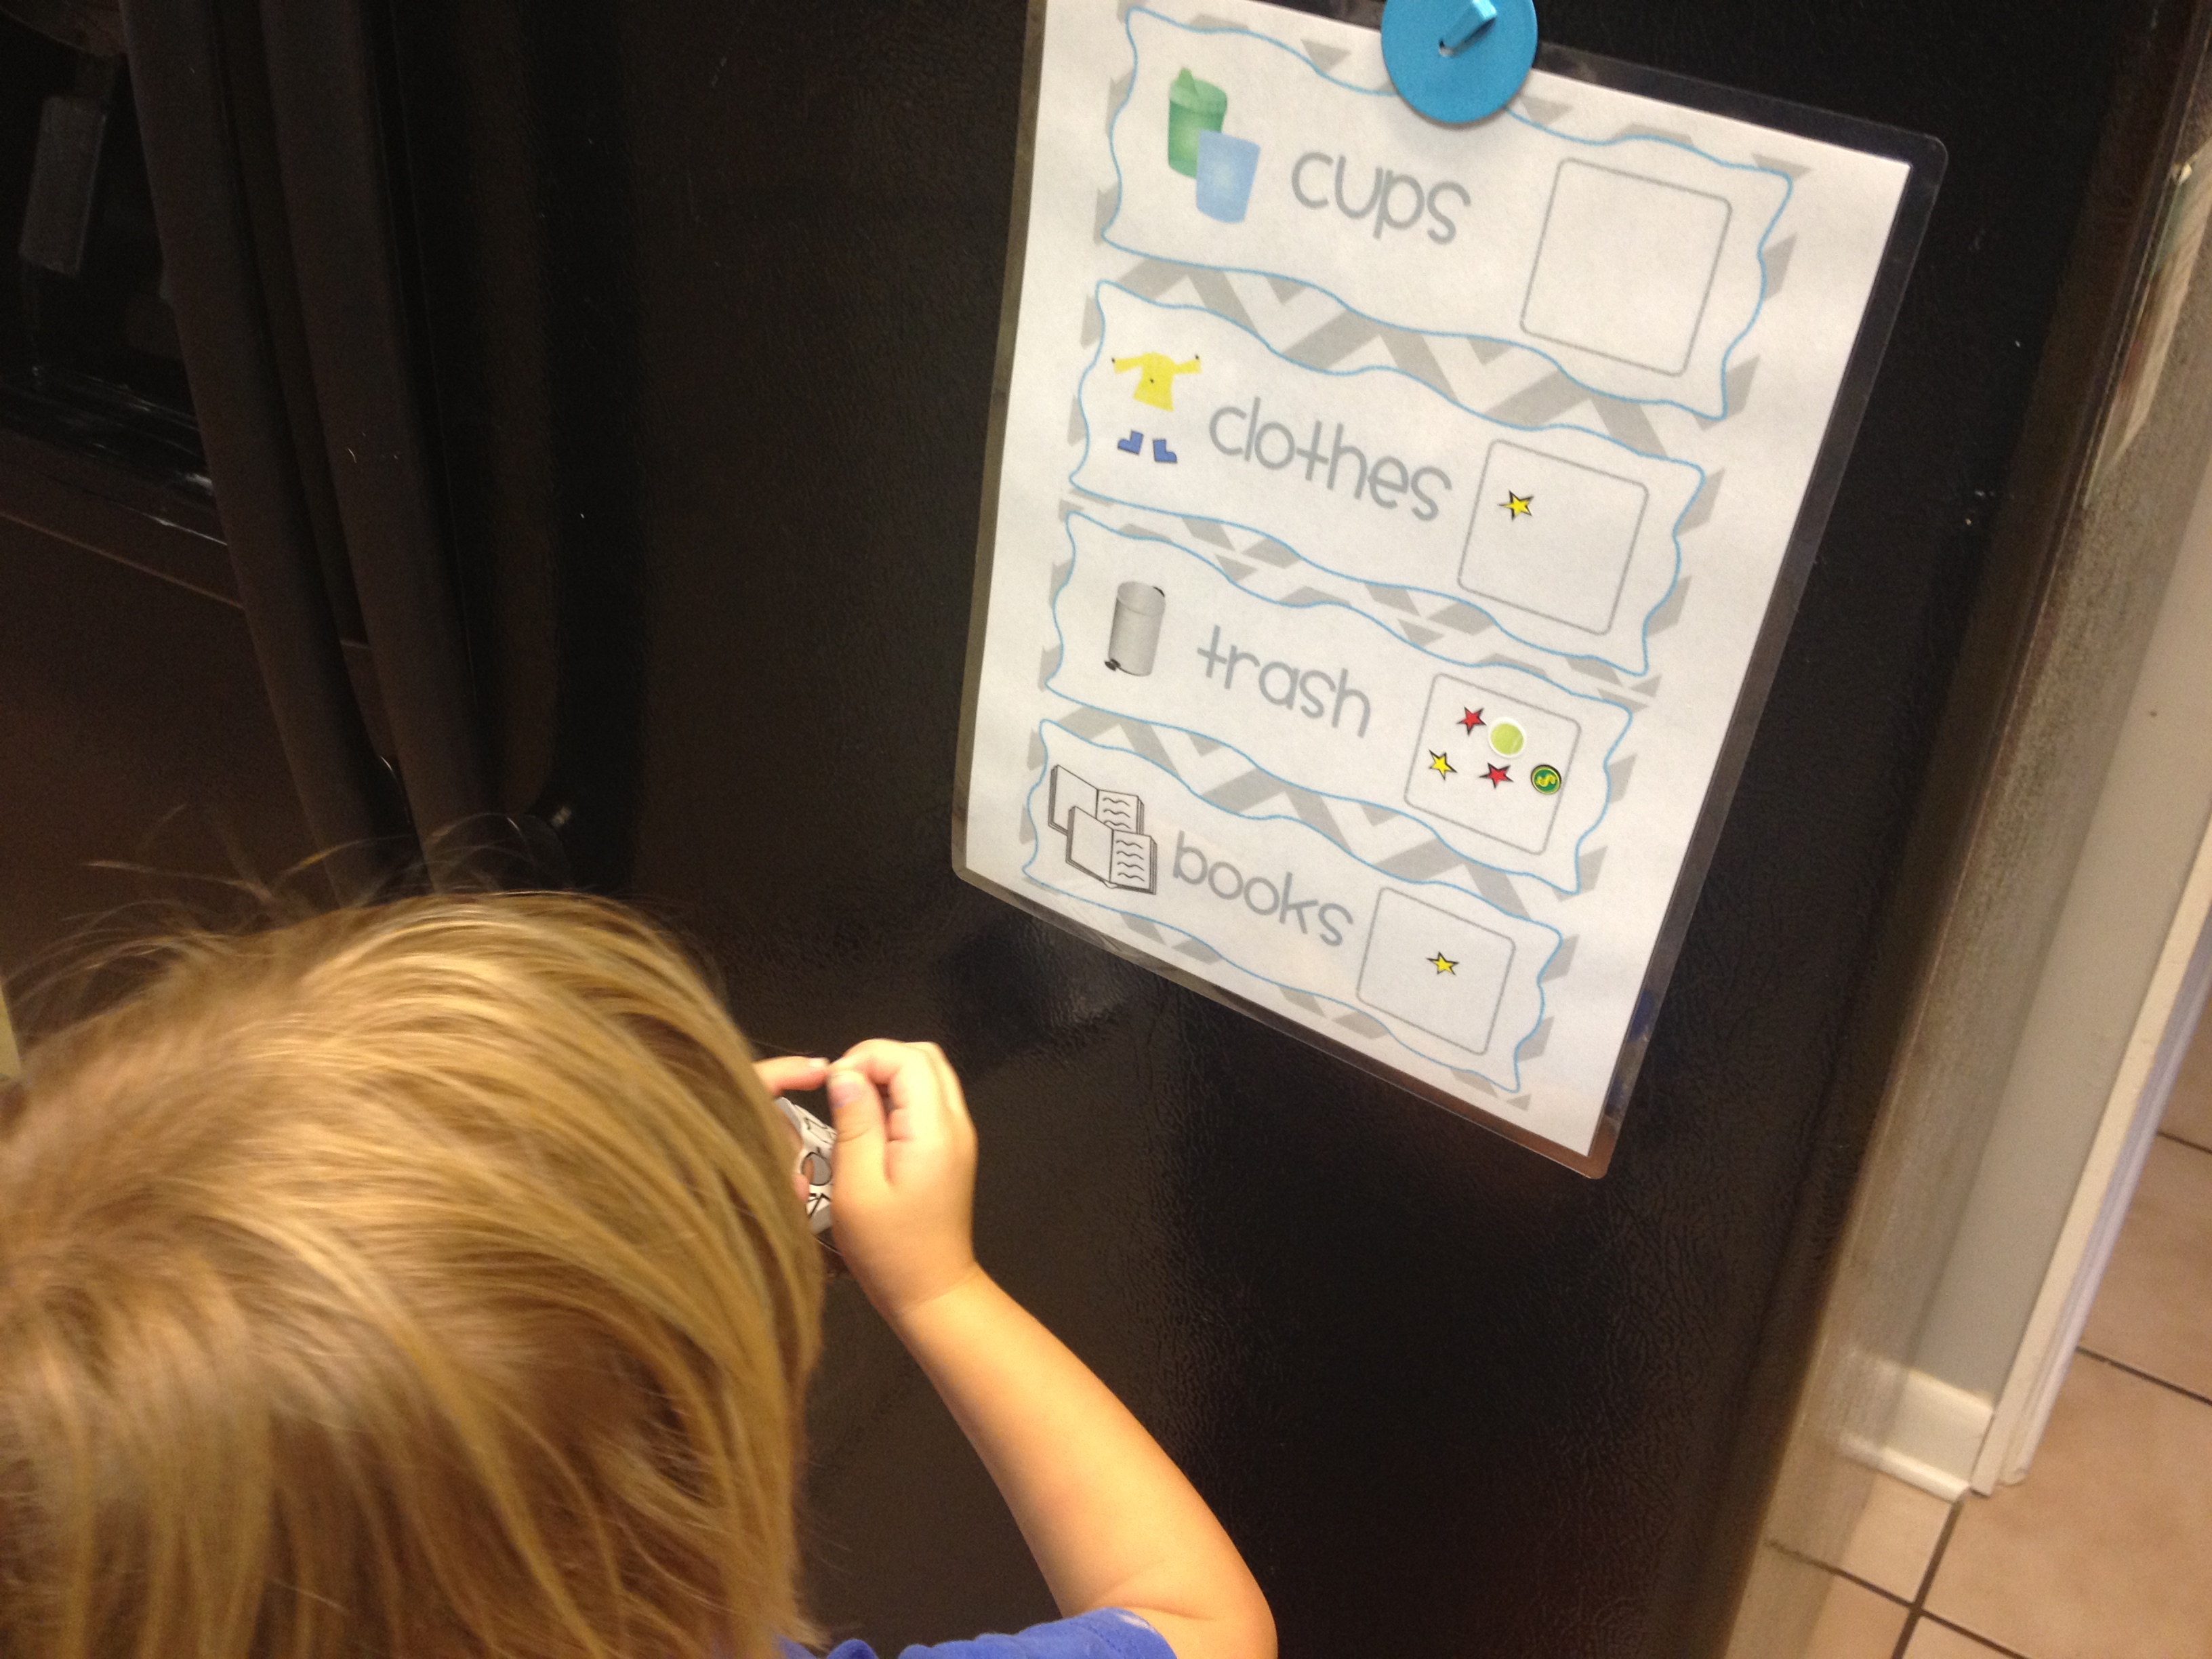
Every time my kids put a sticker up, I say “Oooh we are going to fill up all the boxes and we will be able to see how hard we work.”  This week our “trash” box is getting full so I asked Sean Patrick what he thinks we pick up the MOST of and what we needed to pick up MORE of so that I can keep him familiar with important math terms.

photo 3

I am not giving him some big reward for filling up the boxes at this time because I want to get him accustomed to working hard because it pleases God not just to get the incentive. 🙂

Enter your e-mail in the sidebar to get this printable FOR FREE!

[Click HERE to become a member for just $5.00 and get unlimited access to ALL The Mommy Teacher Printables including this one!

OR CLICK HERE to see it in my TeachersPayTeachers Store.

Food Fun

Hi!  I’m Casey from Kidspired Creations!  I have been a guest blogger a few times on The Mommy Teacher am very excited to now be co-blogging with Jessica!  I am a former Pre-Kindergarten and Kindergarten teacher and am currently a stay-at-home Mom of 3 little ones ages 5, 3 and 10 months.

I have to admit that despite my best attempts, not all of my Mommy Teacher moments get the best reception from my kids.  I think if I say, “Let’s make a pattern!” one more time, my 3-year-old might throw a toddler tornado-sized tantrum.

IMG_6932[1] Yes, my kids can get burnt out on lessons from this Mommy Teacher; however, I know how to win them over every time:  food, particularly pizza.

I recently saw a recipe on Pinterest that involved cutting zucchini in half long ways, carving out the insides and filling them with various deliciousness.  I decided that these “zucchini boats” would make great pizza crusts!   This idea perked interest with my kids so quickly that I couldn’t prep fast enough.

Zucchini Boat Pizzas

-Ingredients:  zucchini, pepperoni, mozzarella, pizza sauce

-Pre-heat oven to 350 degrees.  Cut zucchini long ways and spoon out a trench on the inside.  Spread a few spoonfuls of pizza sauce inside.  Fill with mozzarella cheese.  Top with pepperonis.  Place on the oven for 15-20 minutes or until zucchini is tender.

Easy peasy… and so delicious that even my super-picky 3-year-old was digging into the “green crust.”

Here are the different skills we covered while making our pizzas:

Math IMG_6931[1]

– Sequencing: “What is the first step to making our pizza?  What comes next?”

– Measuring:  “How long is our zucchini?  Let’s measure in pepperonis.”

– Adding:  “Our pizza needs 3 pepperonis.  There are 2 pepperonis on the pizza now.  How many more do we need to add to make 3?”

-Counting:  “How many pepperonis are on your pizza?”  How many pepperonis are there all together?”

-Multiplying:  (for the school-aged child)  “If we have 3 pepperonis on 10 pizzas, how many pepperonis are there all together?”

-Time:  “Our pizzas need to cook for 20 minutes.  Let’s set the timer.”

Motor Skill Development IMG_6928[1]

-Pouring and spreading the sauce with a spoon

-Sprinkling the cheese using our fingers

-Using the pincer grasp to separate the pepperonis

Language Skills

-Sequencing Vocabulary:  first, second, next, then, last, before, after etc.

Health and Nutrition:  Learning about making healthy choices by substituting with fresh vegetables and what food groups are being included in dinner

Following Directions and Recipes:  Following step-by-step or a series of directions is different than following one direction at a time.  “So, I put the pepperonis on first right???  No?  Well, what do the directions tell me to do?”  You can take this a step further than I did by drawing or writing out the recipe for your child to have a visual to follow.

Social Behaviors:  being a happy helper in the house!  It is important for kids to take ownership over household tasks and doing it with a happy heart!

* * * IMG_6933[1]

My kids do not like to try new things, but since they made the dish themselves they were eager to dig right in!  More surprisingly was my 3-year-old who didn’t shed any tears before his taste test!  That’s quite an accomplishment at our dinner table!  Everyone was happy… even the baby who got pureed zucchini that was scooped out of the middle of our boats.  Bonus!


Teach While Brushing Teeth

Is anyone else forgetful when it comes to encouraging your child to brush their teeth?  Or did I just shame myself?

Well, I found a way to help you and your child remember and even have some motivation for brushing teeth.

After you type in your child’s name, and print out the chart, stick this cool. personalized printable  on the door of your child’s room or bathroom and tape a ziploc bag with a crayon or two inside of it.

This chart is a great way for your child to learn (or be exposed to) organizational skills, graphing, calendar skills, and responsibility.

When helping Sean Patrick brush his teeth I always sing a transitional song, “brush your teeth, ch, ch, ch, ch, ch, ch, ch, ch, ch!” I’ll spare you the sound bite!

Found this in my files…yes, I take a picture of EVERY moment in my child’s life.

And, I encourage SP to “get all the germies out.”

Naturally, we talk about positional words like top, bottom, under, sides, inside, outside, etc.

So yeah!  Let me know how it goes…I want feedback people!  You love it?  You hate it?  You would never do this?  Try it for a week and once you get in the habit you will quit the coloring business?  What of it?

But yeah, the chart is pretty cool.  I would color it for my toddler but older children should be able to color it themselves after you model it a bit.

Chalkboard Placemats

I have been patiently waiting to write about these mats ever since I saw them 2 weeks ago on the pioneer woman’s site.  I contacted Leslie who has a super cute blog and asked if I could help spread the word about these awesome placemats because well, they are awesome!  I mean, what better way for your little one to practice writing their name, family members names, practice sounding out the names of the menu items, draw the shapes or other observations they see, etc. 

If you are grossed out by chalk at the dinner table, SET a kid’s table and let the adults finish enjoying their food and the kids can retreat to the kid’s table to develop their fine motor skills and enjoy their creativity.  I love the thought of turning the dinner table into a learning table.  The possibilities are endless really. Order them HERE!!!

(Pictures from the bafriend site)

This one says it all!

Can you picture it yet?

Learning in the Kitchen

This past Thursday night, I cooked a meal for a group of college students, and one of them told me “I hope I’ll be able to cook meals like this one day.” 

That one comment got me thinking about SO many things:

My first thought, to be honest, was satisfaction – who doesn’t like to make a crowd-pleaser? 

Second thought, I was proud of how far I’ve come because before I got married I couldn’t cook macaroni and cheese.

Thirdly, I wanted to help this college student learn to cook because I love to teach about anything I have learned about (hints this site!).

Finally, I thought about how it was sad that I didn’t take the time to learn cooking tips from my mom and dad when I was young.

This reminded me of one of my FAVORITE things to do with kids, when permitted: bake or cook!

Maybe you already do this, but I have a couple suggestions to pack this activity full of learning opportunities.

Before starting, read a book like “The Little Red Hen” “Pete’s a Pizza” or another book that prepares your little one for the process and purpose of cooking or baking in a fun and meaningul way.

First, write out the recipe WITH your little one on a large piece of paper, and then read each ingredient as you pull it out.  Ask them questions and give them clues “What ingredient do you think starts with the sound /m/?” (milk!) This will give you a chance to model reading and writing for your little one.

Next, measure each ingredient WITH your little one so that they have the chance to experience measuring for accuracy and to observe large and small amounts and they will naturally observe science in action as dough rises and ingredients mix together, etc.

Finally, let them take on as much ownership as you are willing to share: stirring, spreading, sprinkling, watching the timer, or whatever your recipe calls for.

Ask your little one what he or she wants to make or bake! Have fun! 

Casey shared these pictures with me from the Young Chef’s Academy

Mommy and daughter measuring to make the dough from scratch – ambitious!

Mommy and Daughter making the measurements precise. 

Mommy and her big boy rolling out the dough.

James is enjoying the pizza sauce…mmmmmmm.

Putting on the cheese….my favorite part of pizza making.

And last step of prep….toppings of choice!

Here is a pizza recipe you can write out, cut out the pictures and use them when you write out the directions for the recipe.

Please share pictures on my mommy teacher facebook page of other FUN cooking experiences you share with your little one!

Related Posts Plugin for WordPress, Blogger...

1 2