ABC Activities

Formation Fun with CARS

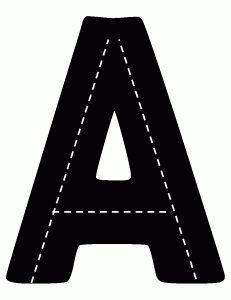
When I was chatting with my friend about her 3 year old, very active little boy, she told me how hard it can be to sit him down with a writing utensil of any kind.  She often does other tactile (syn. tangible) means of getting him to write like writing in shaving cream or rice, but when I suggested “highway letters” – writing with cars, she printed them right away knowing that he would love this activity! So, here is a link to the Highway Letters  from makelearningfun.com and this is how I suggest using them:

1)      Print each letter onto cardstock (bought almost anywhere paper is sold…walmart, hobby lobby, etc)

2)      Place them (back to back) in sheet protectors.

3)      Focus on a few letters at a time.

4)      Give them 5 minutes to free play with them first so they get their excitement out.

5)      Show your child how to drive the car along the “A” to make the right formation.  Teach them to “stay on the road”.

6)      Drive the car with your child “Let’s try it together” by holding his/her hand while you do it.

7)      Let your child drive without your help.

For more activity ideas that go along with these letters Click Here!

Make A Name Chart

A lot of children want to know how to write someone’s name. They go around with a pen and paper and ask you how to spell whatever they want to write at the moment. Instead of telling them the letter, give them clues instead: the first letter makes the sound /b/, it is the second letter in the alphabet, it comes after the letter “A”, it starts with the same sound as ball, etc. 

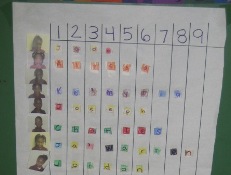
Another way you can help them is to have them reference a Name Chart.  In my classroom, I used to make a Name Chart so that the children could compare the length of their names, the letters in their names, etc.  I would let them write each letter of their name, cut it our, and past it in letter order on the chart.  The children loved to use this to help them write their friend’s names when they drew a picture of their friend. 

But this can also be done in your house as a writing prompt.  Make it as a family and post it in the playroom or your child’s bedroom. 

1. Instead of buying and using a posterboard to display the names and faces just make a word document!

2. Insert a table if you would like to have the “numbers” row; don’t if you dont care for the way it looks.

3.  Insert a picture from a file and crop it until it shows only one face of a family member, friend, or pet.

4.  Ask your child help you find the letters on the keyboard as you type the names beside each picture.

5.  Print it, post it and voila (“there you have it”) a complete work of chART 🙂

Tracing Stamps

The more experience your little one has with writing the more control they will have.  Today’s activity is going to combine a free exploration activity with the structured one….sounds crazy, I know, give me a minute to explain.

I want you to consider purchasing one (or any combination) of the following tracing stamp sets and ink pad.  I LOVE using these with my kiddos and there are so many ways to use them to accomodate to different levels of reading and writing ability.

When you first get them in you are going to show your child how to use them by taking one letter/number at a time and carefully dipping it in the ink, and then carefully placing it on the paper. 

You can show your child the letters it takes to stamp your name, his/her name, and many other words they want to know how to spell, but FIRST…let them PLAY.  I know…takes all the fun out of teaching doesn’t it haha.  But this is called free exploration, and children need to have time to play with materials (which are toys to them) before working with them.  I used to tell my kids “I’m going to give you 10 minutes to play with the _______; then we will do an activity with them after.”

Then you are going to model his/her name, your name (“mom” or “dad”), and maybe a few other simple words. 

Next, you are going to take out a pencil, marker, crayon, colored pencil, or something like it to trace over the letters.

Finally, let your child stamp whatever he/she chooses.  It is okay if it is a string of random letters.  But you are then going to take your child’s hand (if he/she is willing to let you help) and trace over the letters together.  Your child can do this on his own when he is confident enough to do so.

If you can’t afford to buy tracing stamps, go to my “Activity Archives” and click on “Tracing the Alphabet.” Simply cut out the letters and let them make their words using the cut outs, and trace them as well!

Toothpick Writing

As the title states, today you are going to let your little one poke out a letter using a toothpick.
Safety first on this one ya’ll…if you dont feel comfortable letting your little one use such a tiny, sharp tool, then use a pen/pencil even a mechanical pencil.
Nonetheless, you are going to use the “Tracing the alphabet” template from “Formation, Formation, Formation” to trace and then use a toothpick to poke through all the holes that make up the letters. This is a great way to reinforce the letter formation because children spend a lot of time concentrating on each letter so it really helps them to recall the letter forms in the future.
Make sure you talk about each letter so that they attach the letter name to its shape.

Tracing the alphabet

fluency is key on literacy Read the Playroom

One thing that I have in my playroom at home is a poster of the alphabet in two places on the wall. This may seem like a teacher-thing to do, but I recommend posting an alphabet on your child’s eye level.

Fluency is KEY in literacy throughout every stage of proficiency. When children “read” things, it means that they realize print carries a meaning. So if you pass the Burger King sign and your child says “I know what that says….it says Burgers” you can encourage them that they are so smart and they are learning to read words. All of their understandings, like the example given, are preceding their literacy foundations.

Today’s activity is one that will hopefully be posted on the wall, right in your little one’s view, to read and practice as often as they choose to do so.

Materials you will need (you may need to shop/order online; each of these are on my homepage under “fav. things”):
-sentence strips (these are long strips of cardstock material…but you can also cut a posterboard into strips)
-marvelous tape (tape that doesn’t peel off paint when you put it on your wall)
-pointer (a cutesy one online or even a fly swatter lying around your house)

Activity:
Write the Alphabet twice (one set uppercase, another set lowercase) onto sentence strips in a pen. Let your little one trace over the letters using a highlighter. Tape them at eye level in your little one’s bedroom or playroom. Encourage your little one to use a pointer of some kind to “read the room.”
Each day you think of something new, or your child reads something (like the word Cheerios on the box) add one new thing to read around the room. Cut out “environmental print” such as the Cheerios box top, the fruit by the foot box cover, etc. and post them in the playroom at eye level. Have a blast!

Related Posts Plugin for WordPress, Blogger...

1 3 4 5 6