Activity ideas

DIY Peel & Stick Window Decals

IMG_20131013_082342_031 My mother-in-law just did a super fun and easy Halloween craft with the kids (and me…she brought extra supplies because she knew I’d want to do one too!).

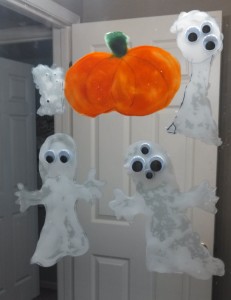
We made ghost and pumpkin window peels/decals and decorated the kid’s bathroom for Halloween.  We had so much fun doing this super easy craft that I think we might just have to make our own window decals for every holiday!


Materials for Ghost Window Decals:

  • transparency sheets
  • white paper
  • school glue
  • permanent marker
  • googly eyes (optional)
  • nail polish remover

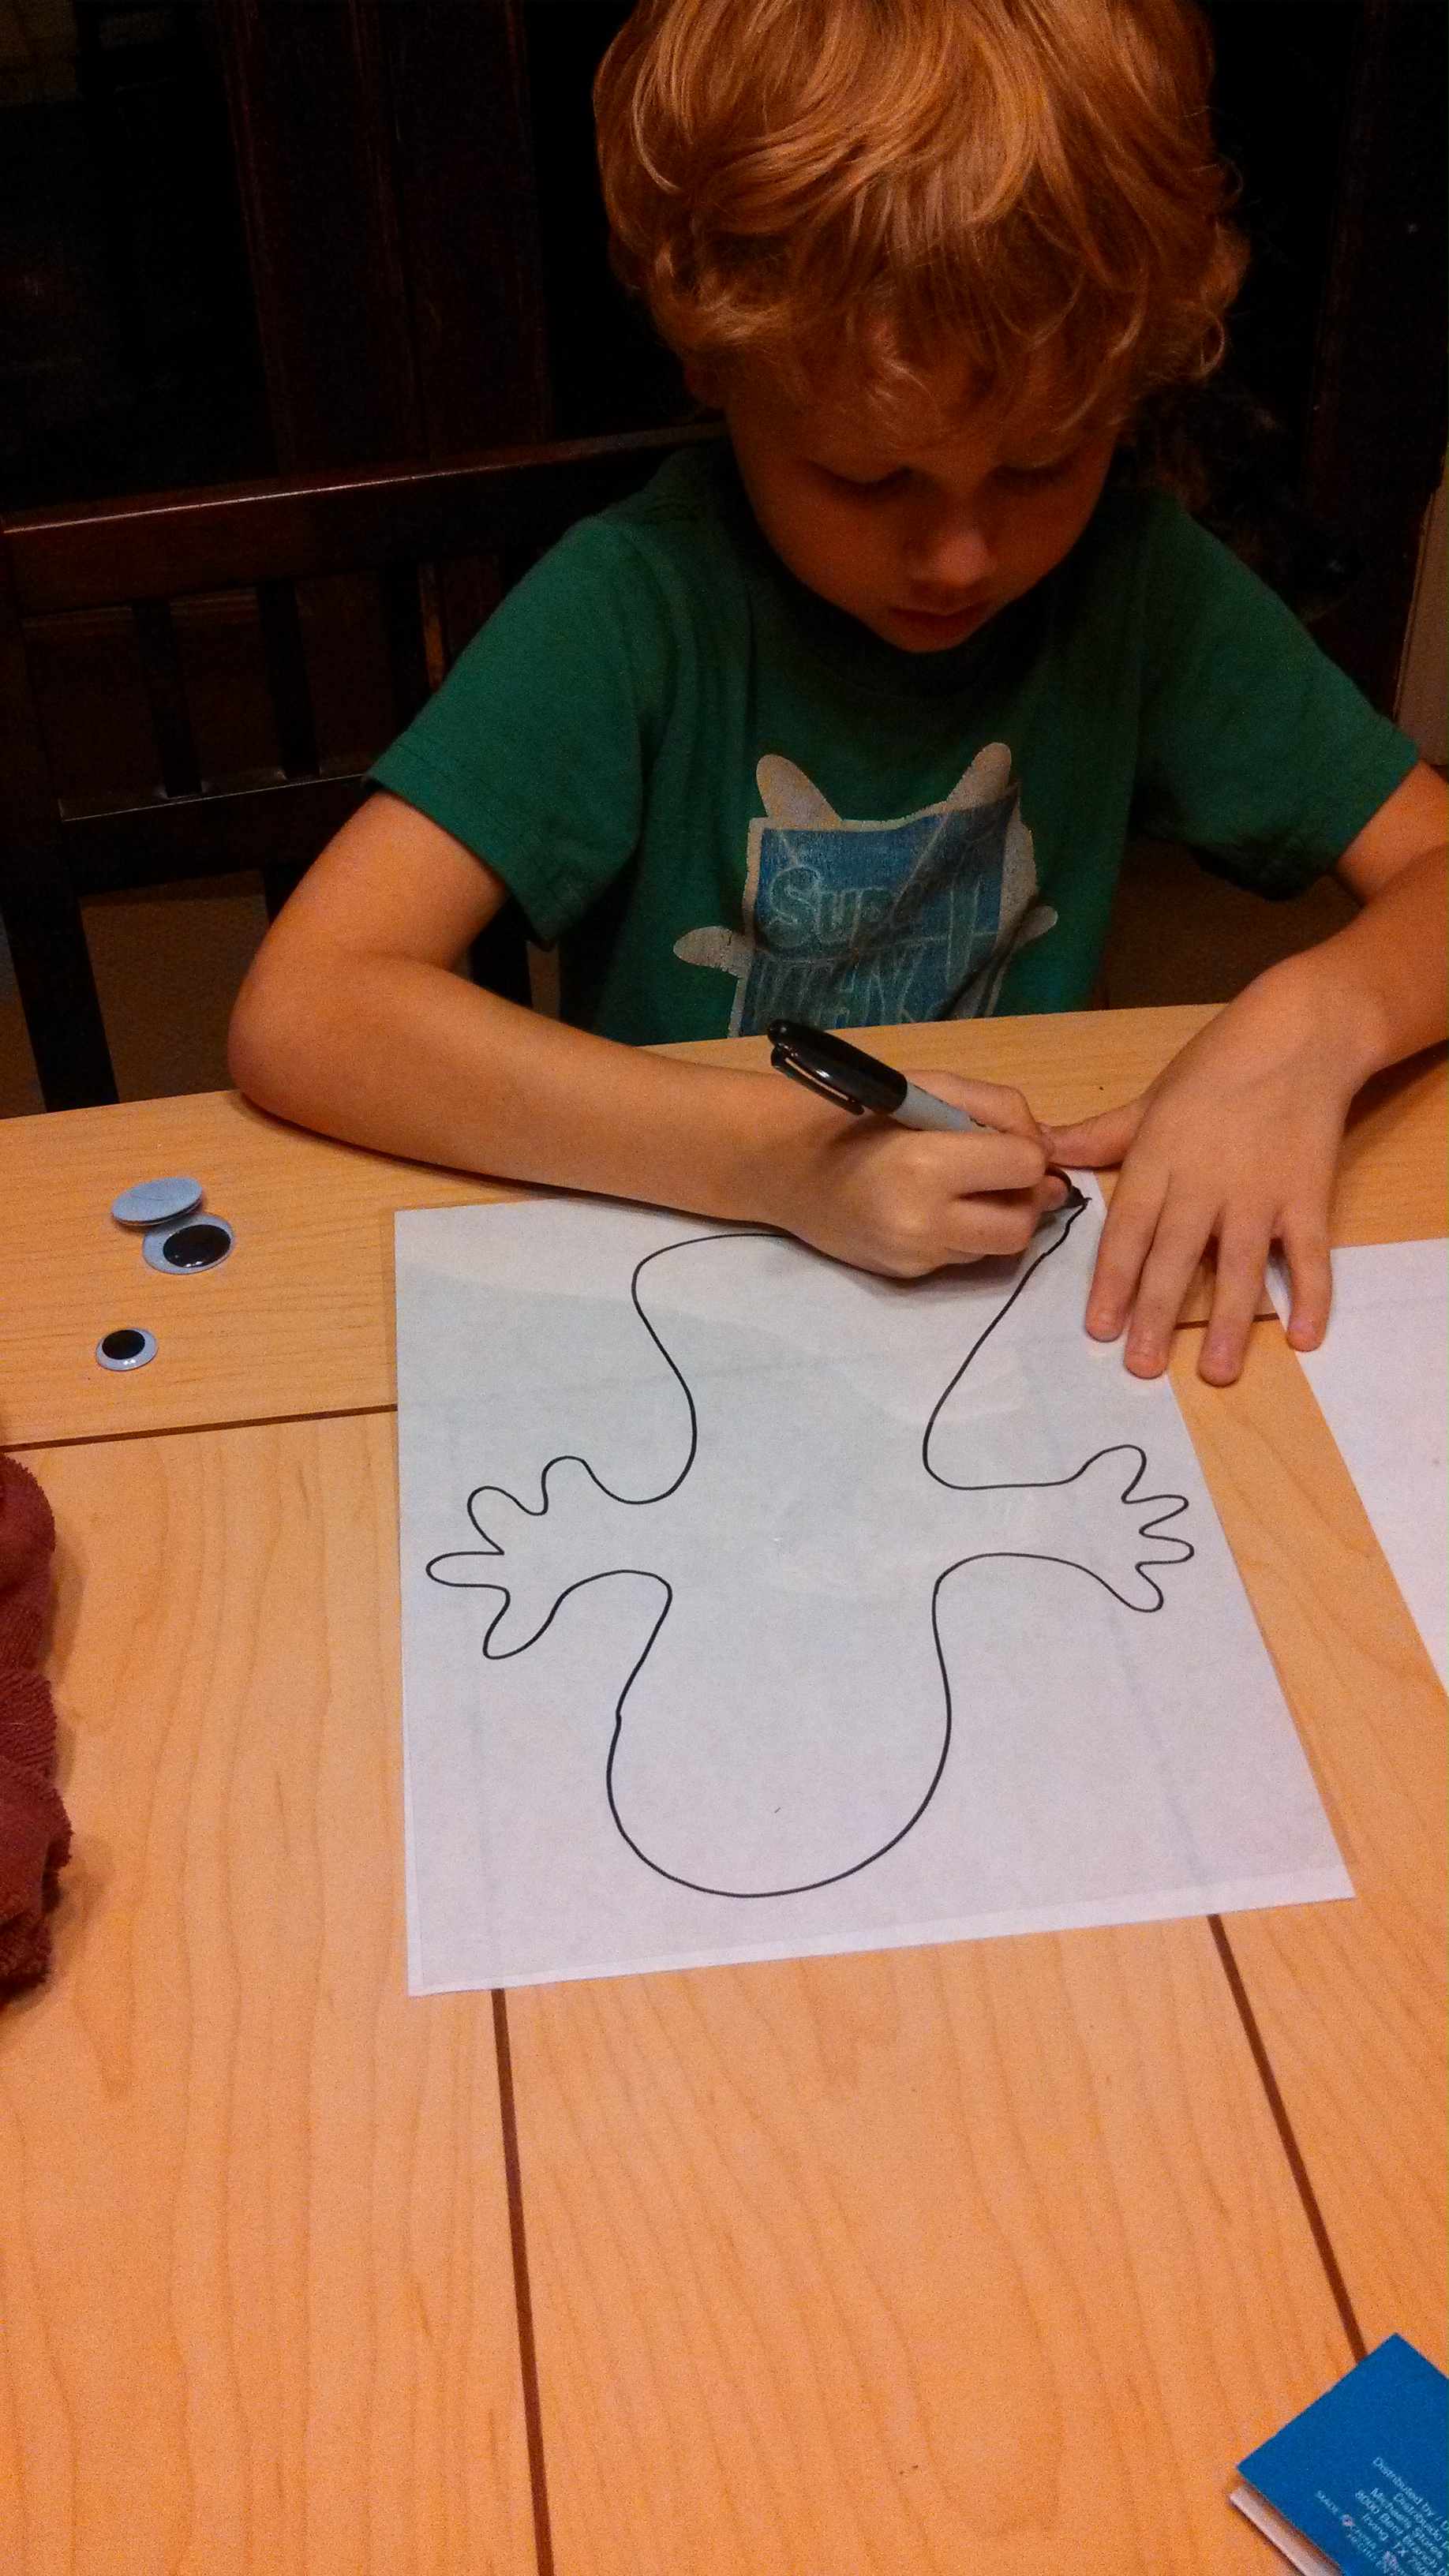
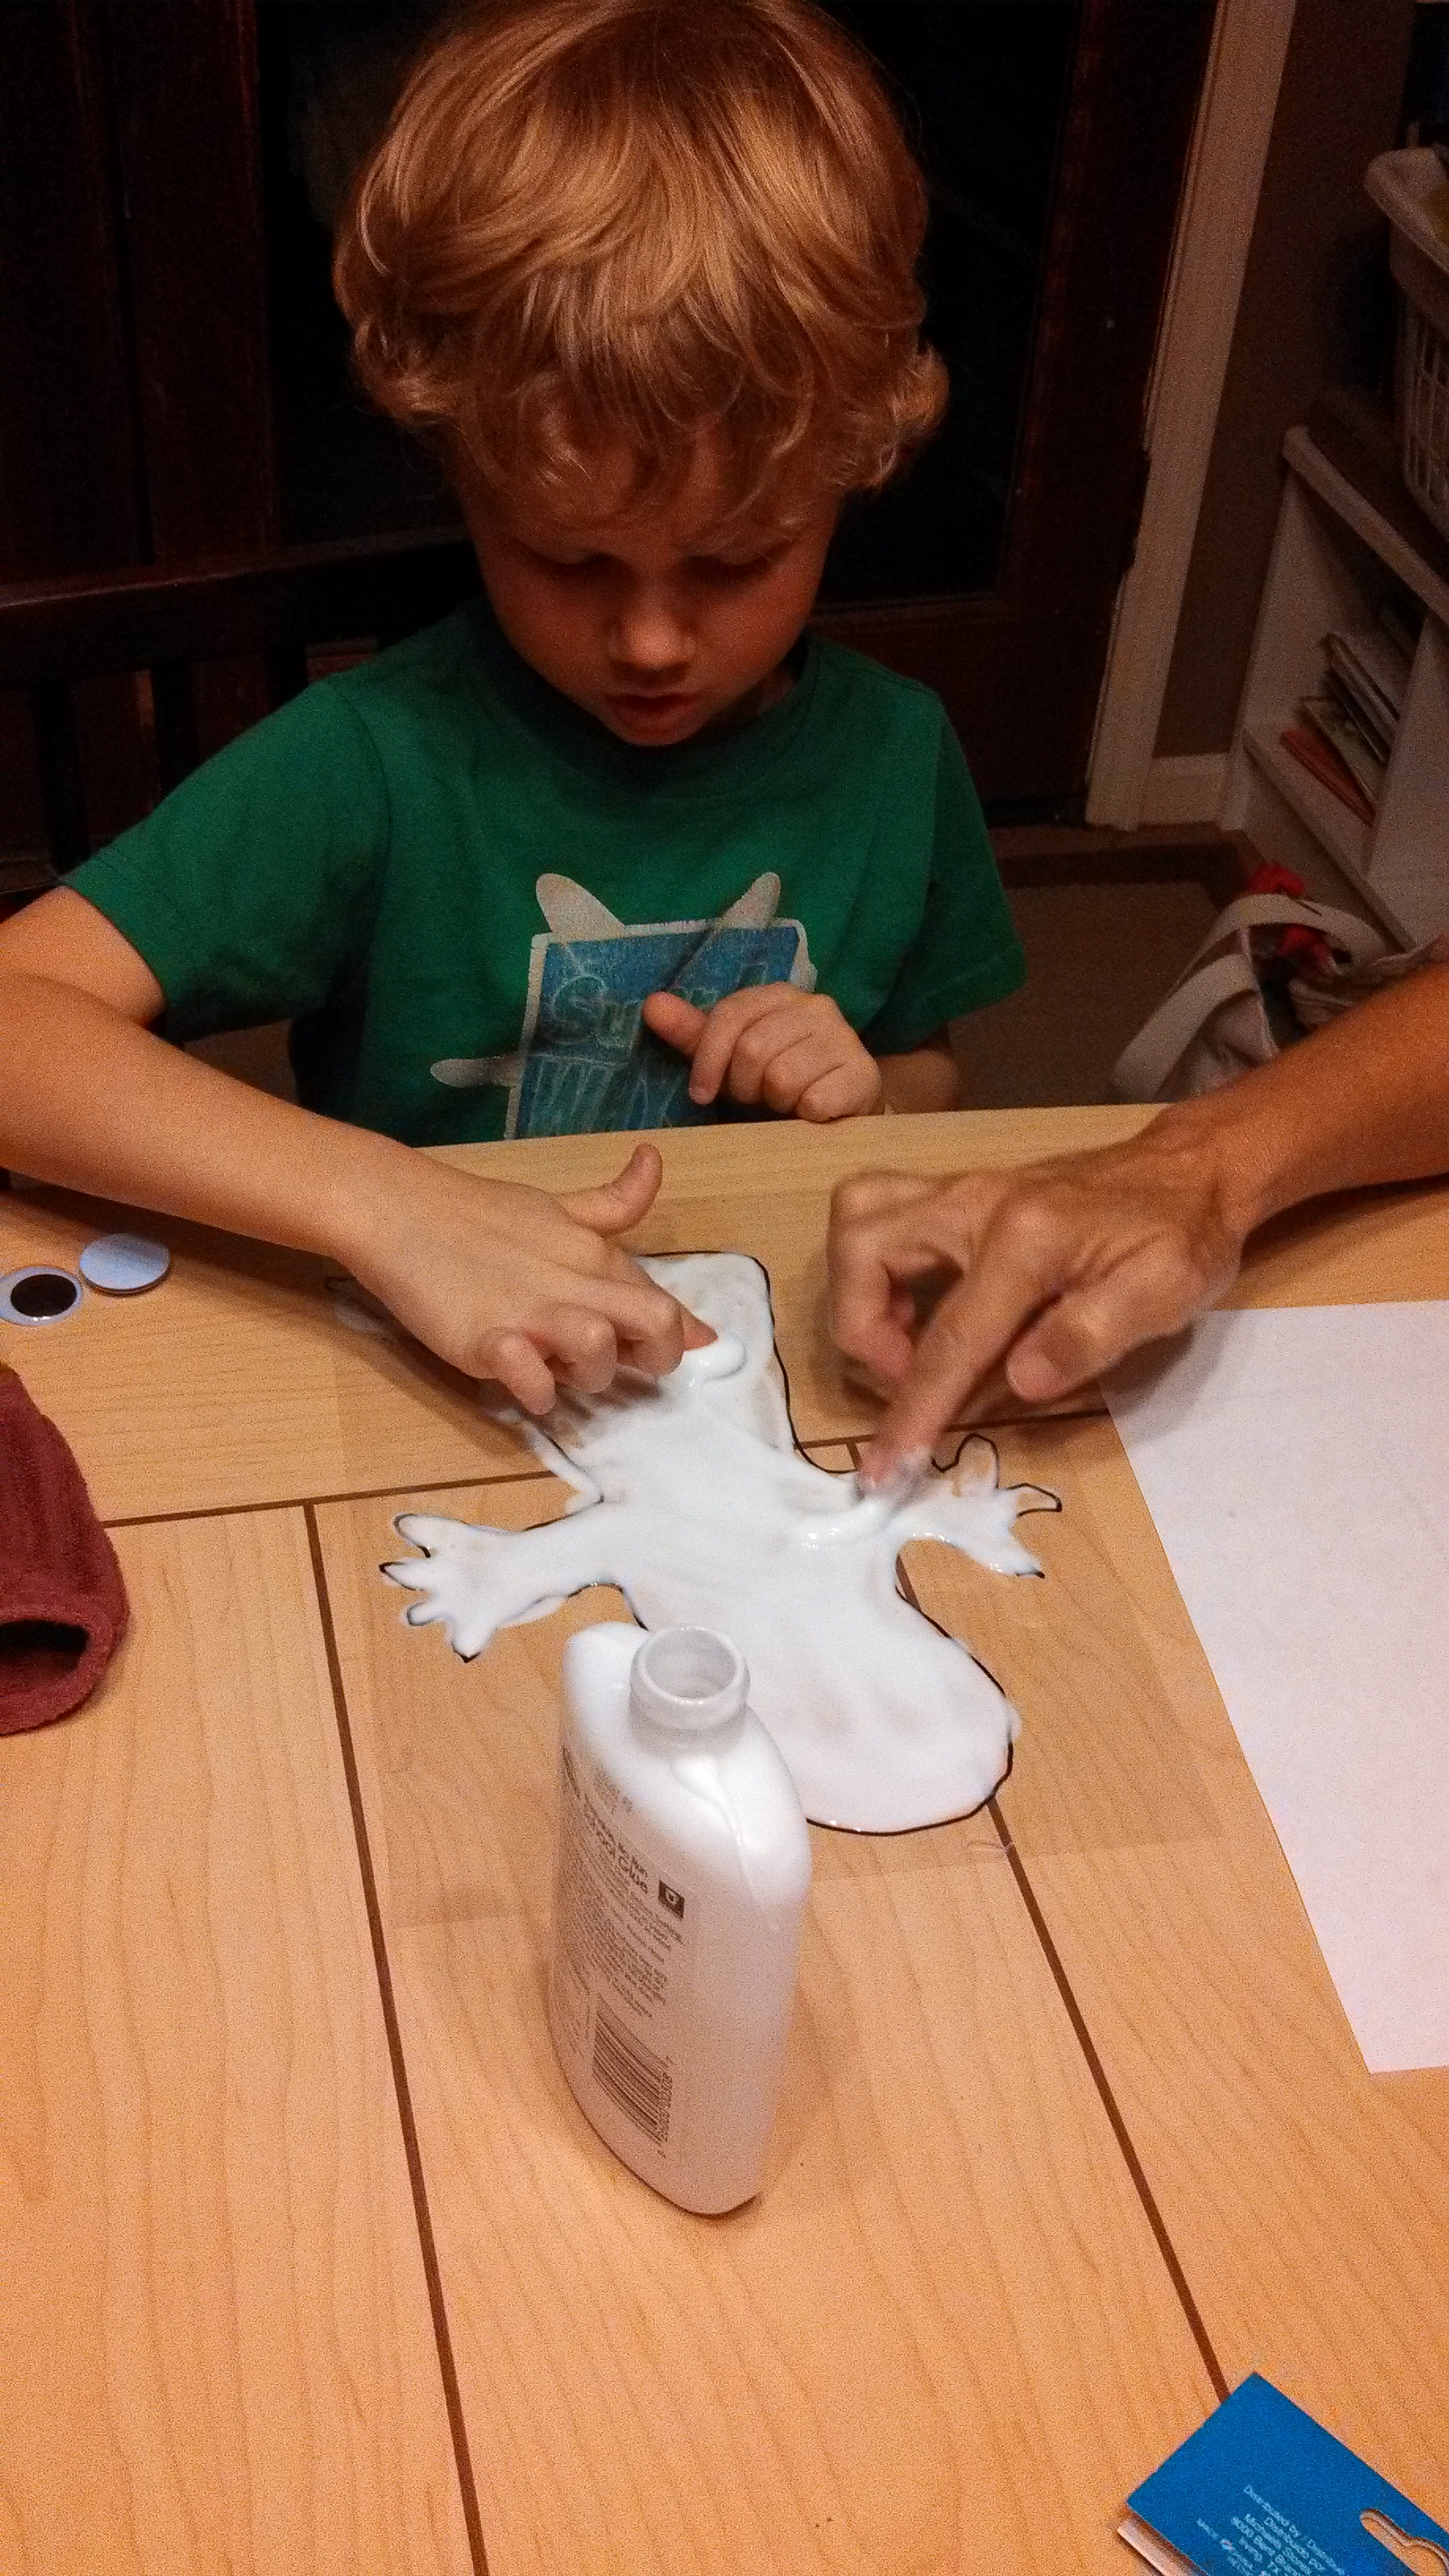
Step 1:  Place a blank paper underneath your transparency (easier to see that you are not writing on your table with a permanent marker).

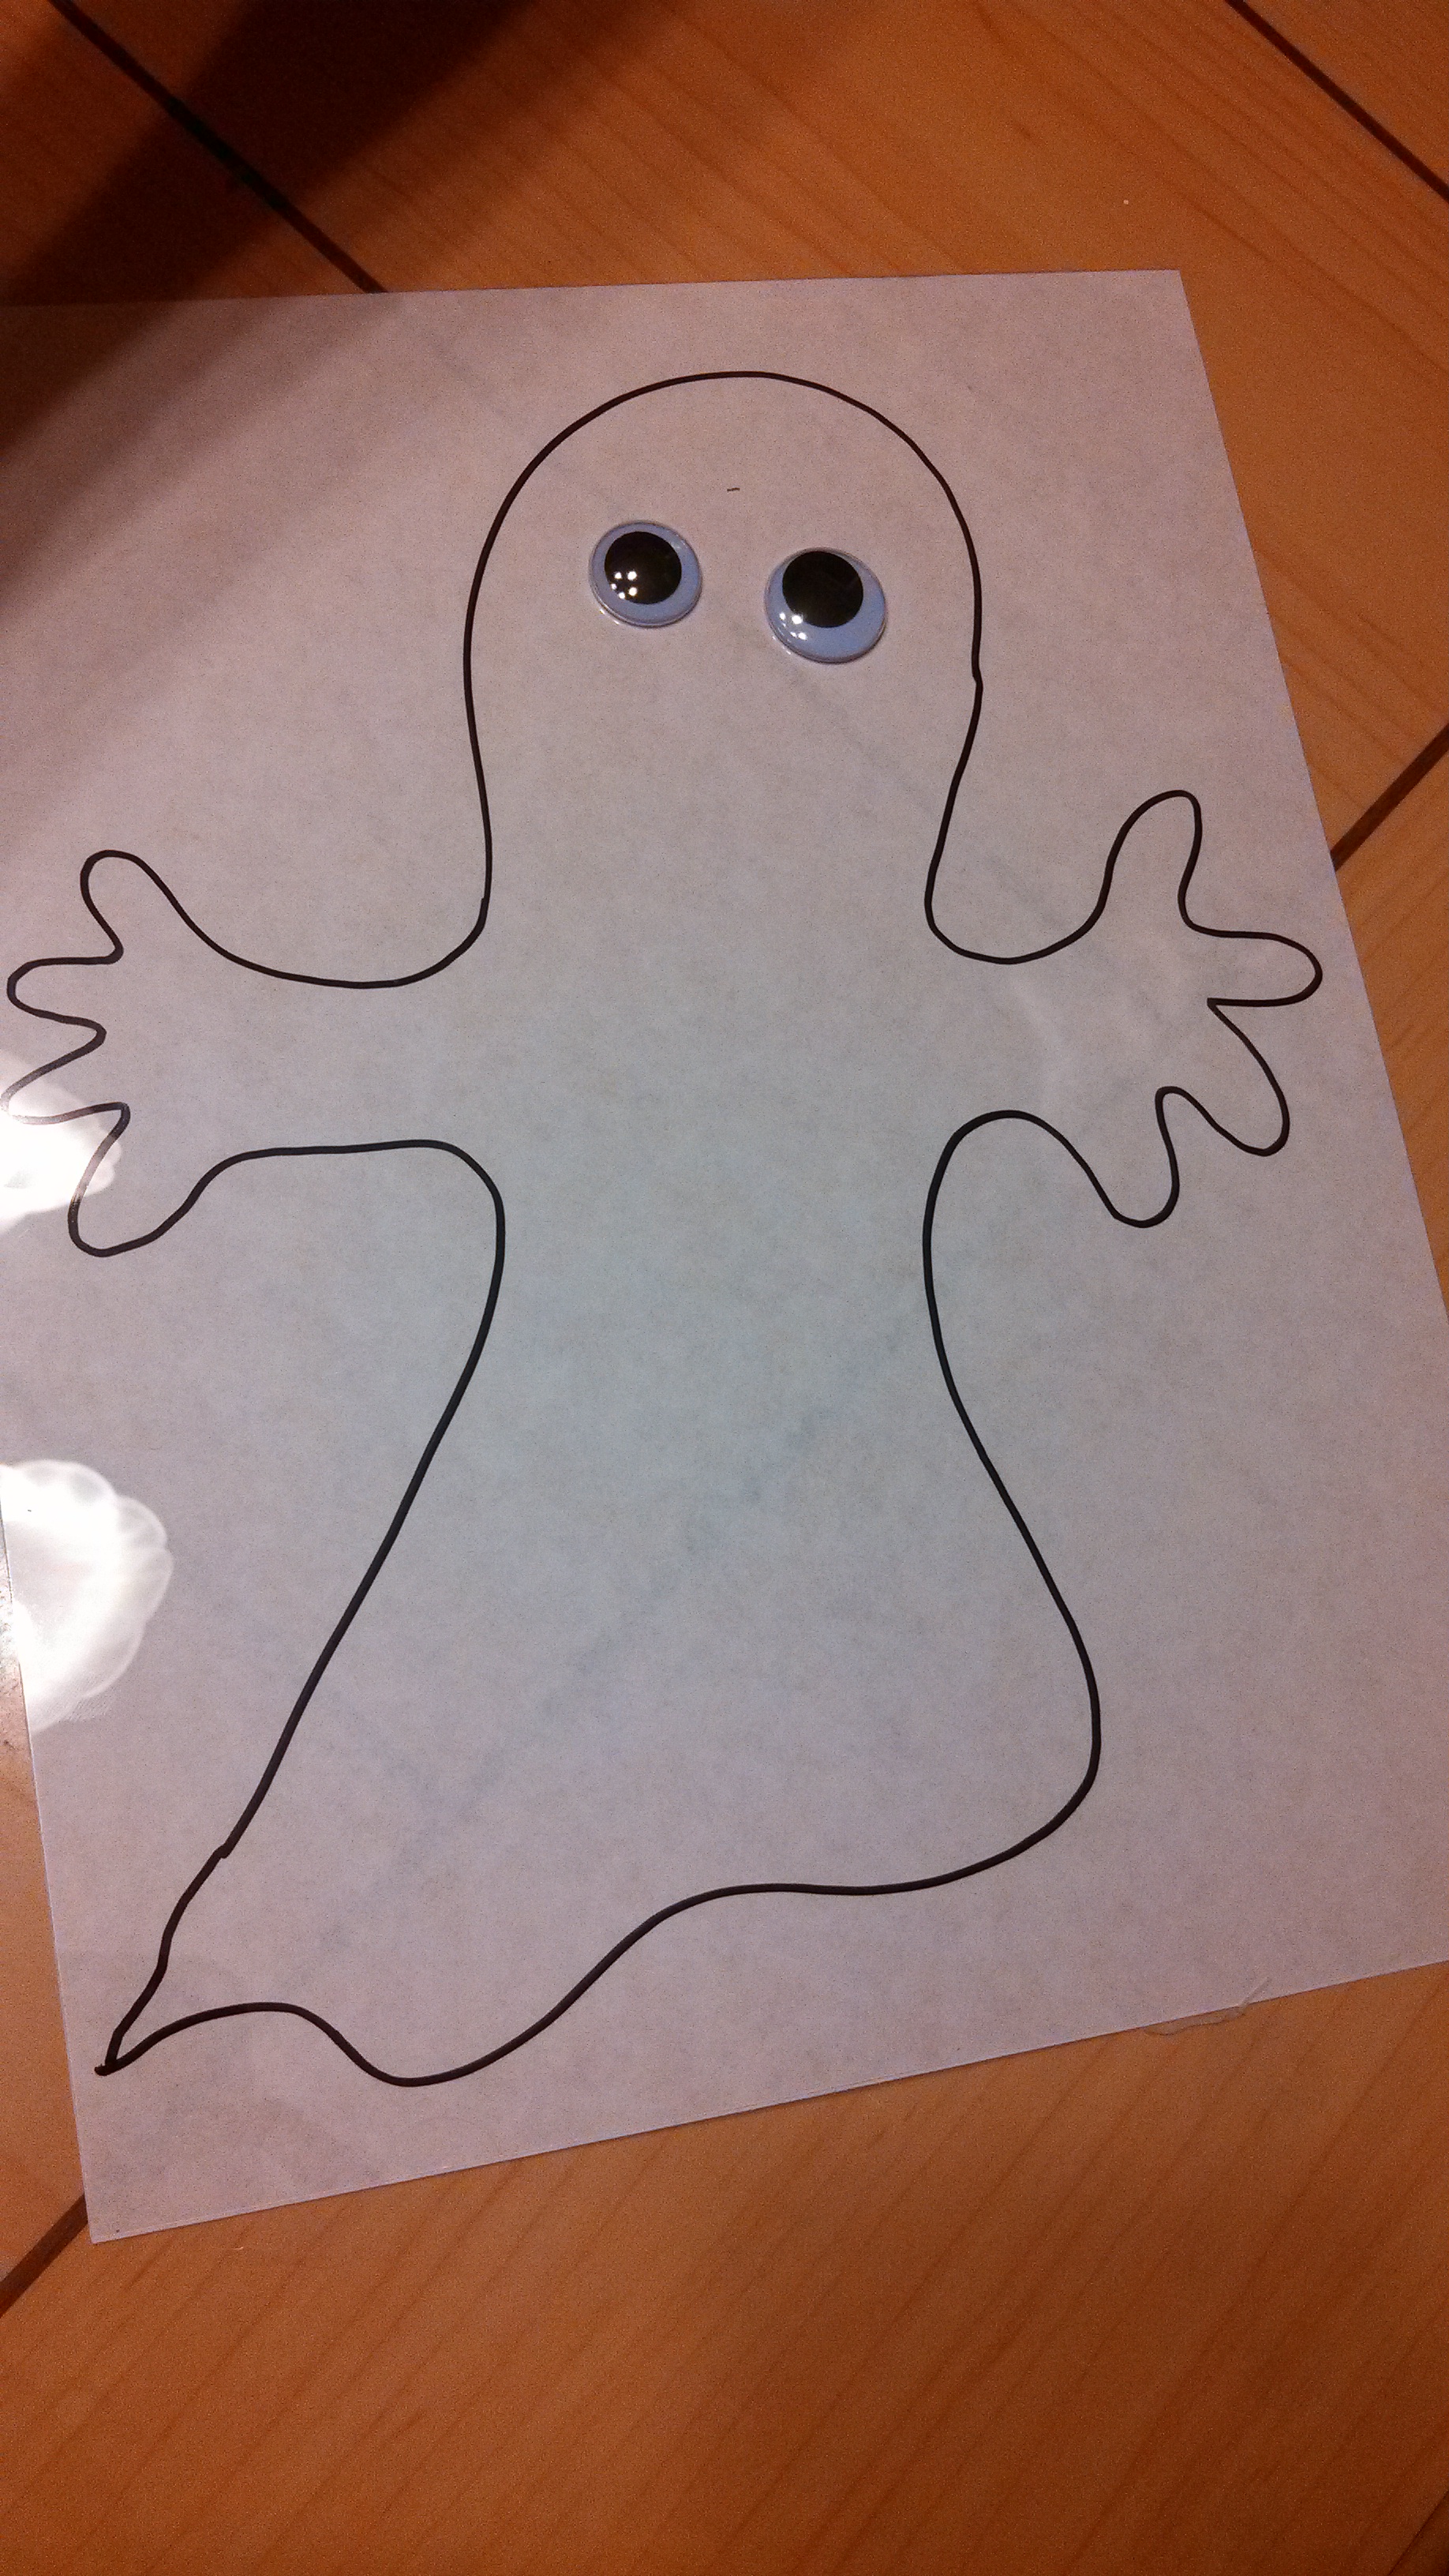
Step 2:  Draw your picture onto your transparency using your permanent marker.

IMG_20131011_210820_181 IMG_20131011_210842_900


Tip:  My 6-year-old had the genius idea to TRACE a picture.  Look through a few coloring books or print a picture off the computer of a simple shape to trace.

IMG_20131011_210849_334

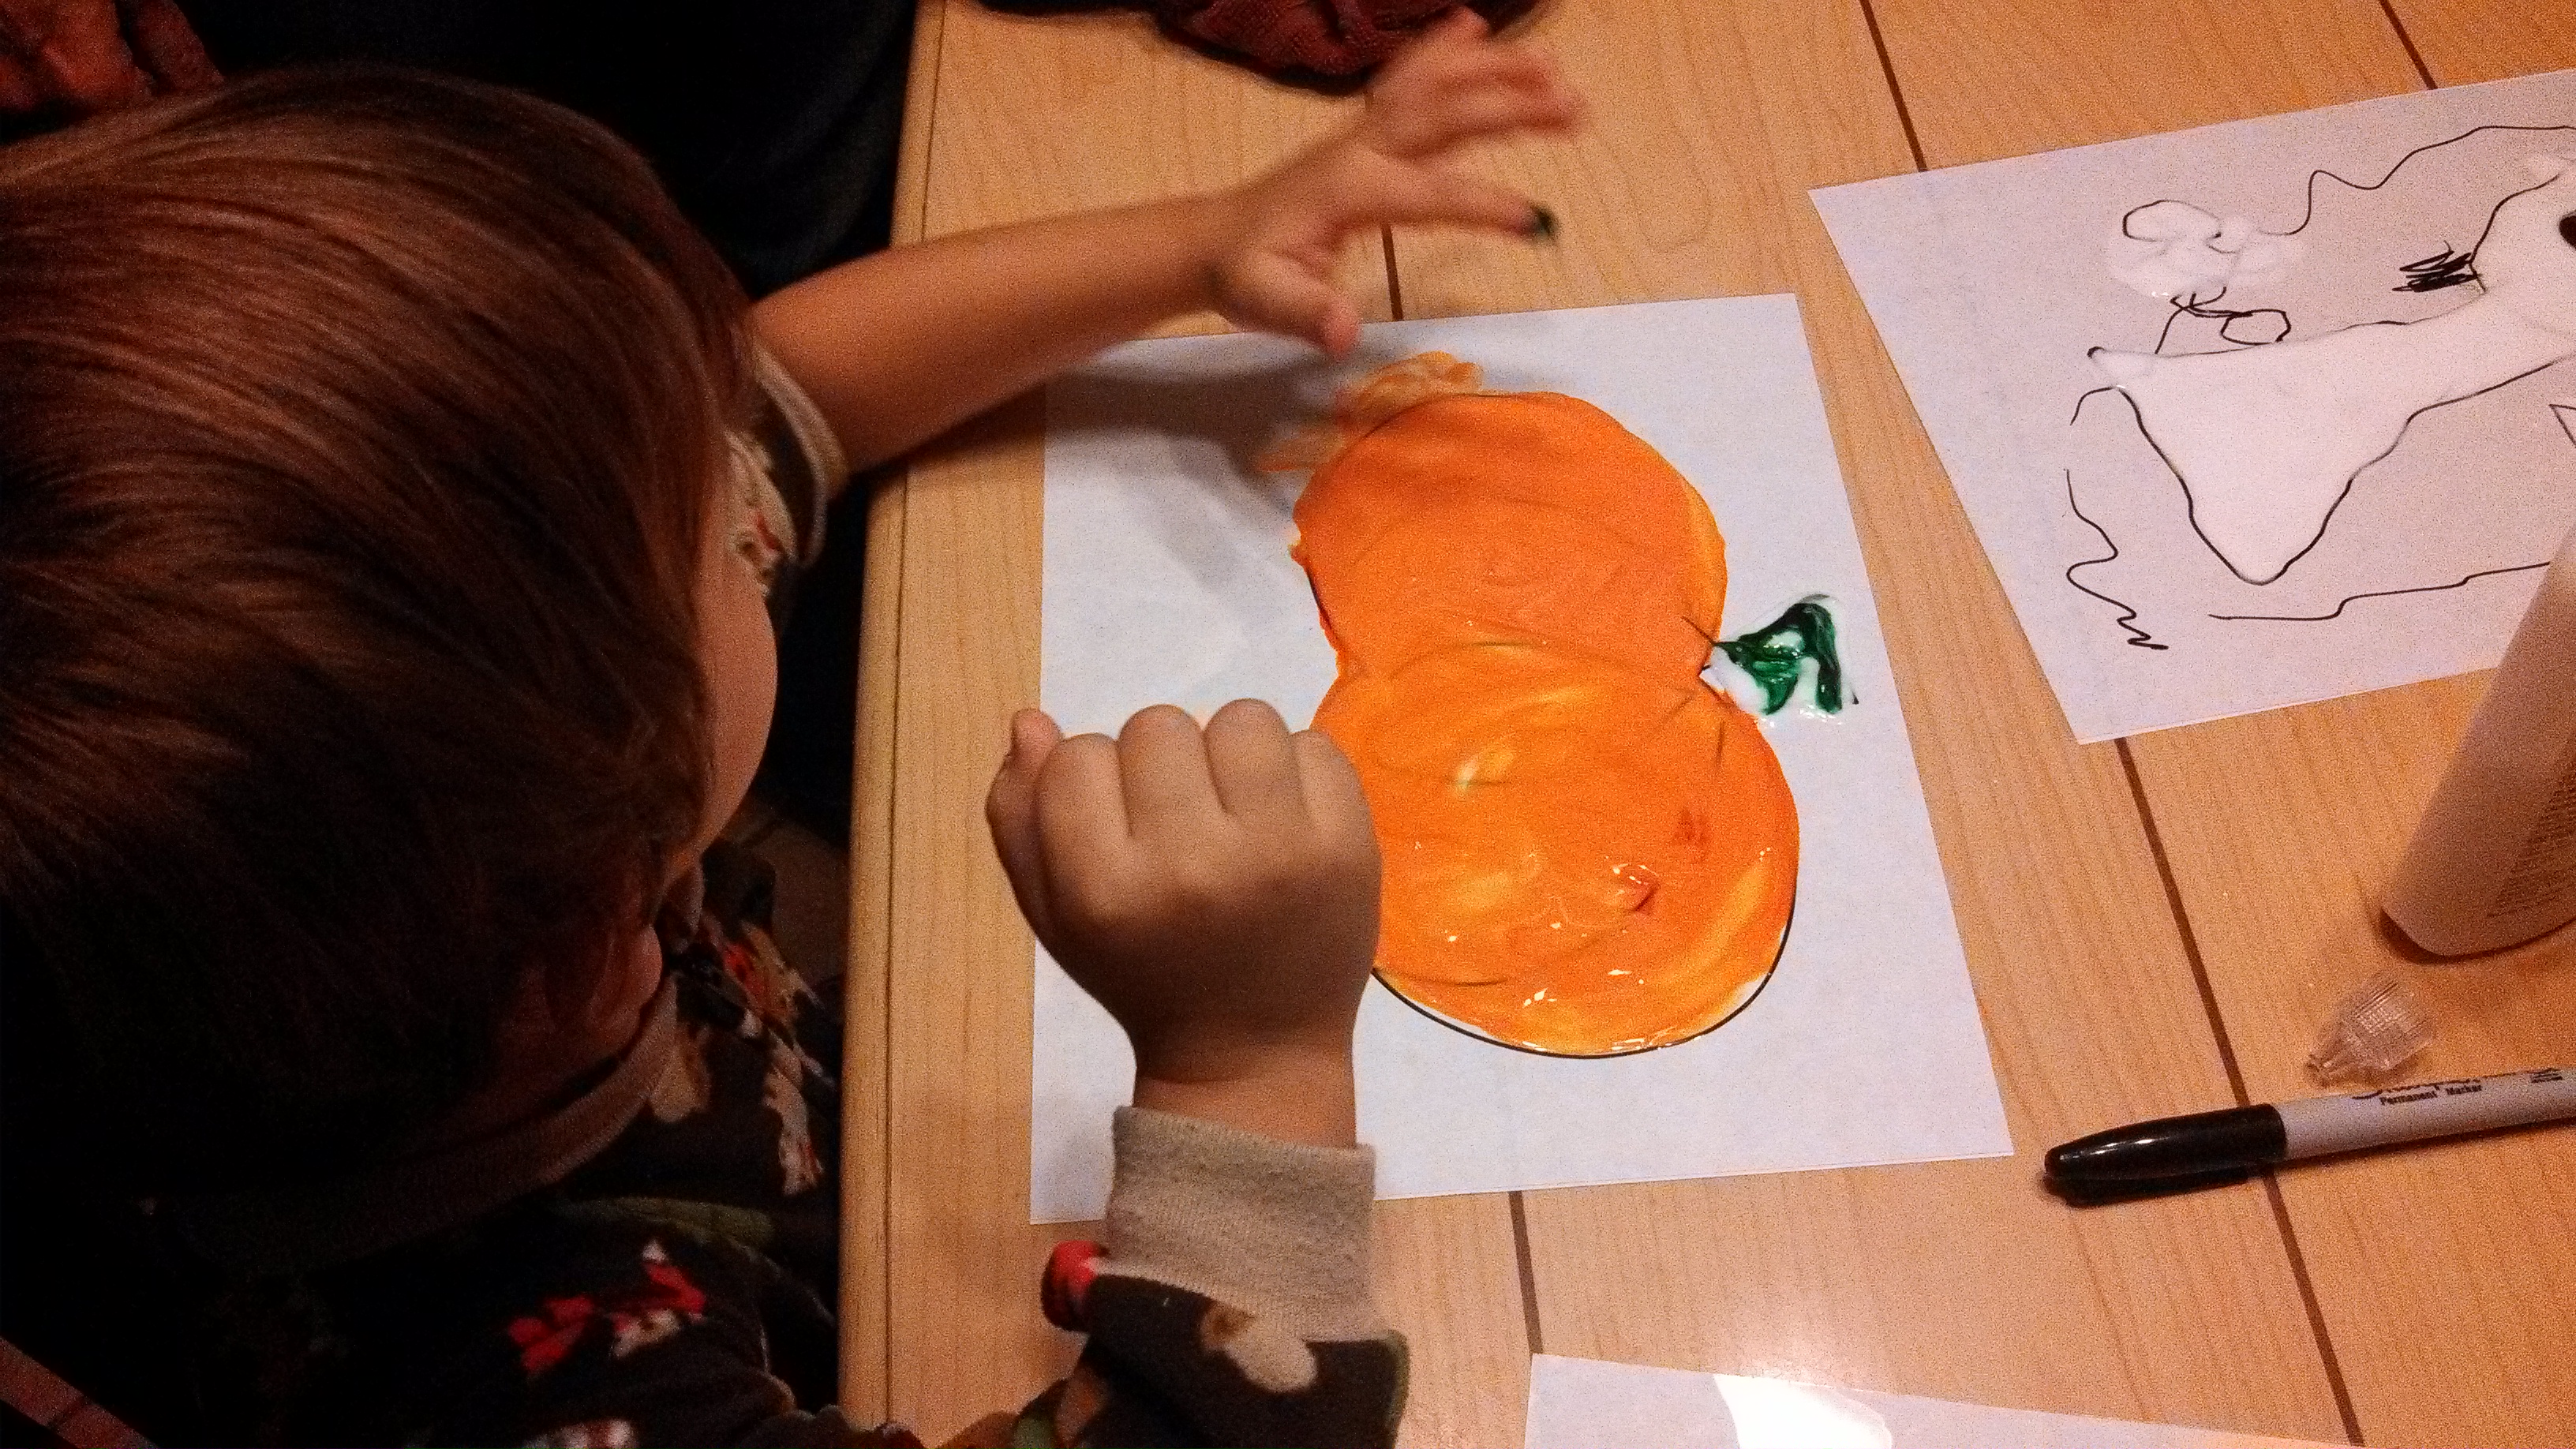
Step 3:  Pour a whole lot of glue inside the outline of your picture and use your finger to “paint” the picture.*  Make sure the glue is thick and even across your entire picture.  It’s ok if the glue goes out of the lines, you can trim that off later.

IMG_20131011_210958_639 IMG_20131011_211328_667

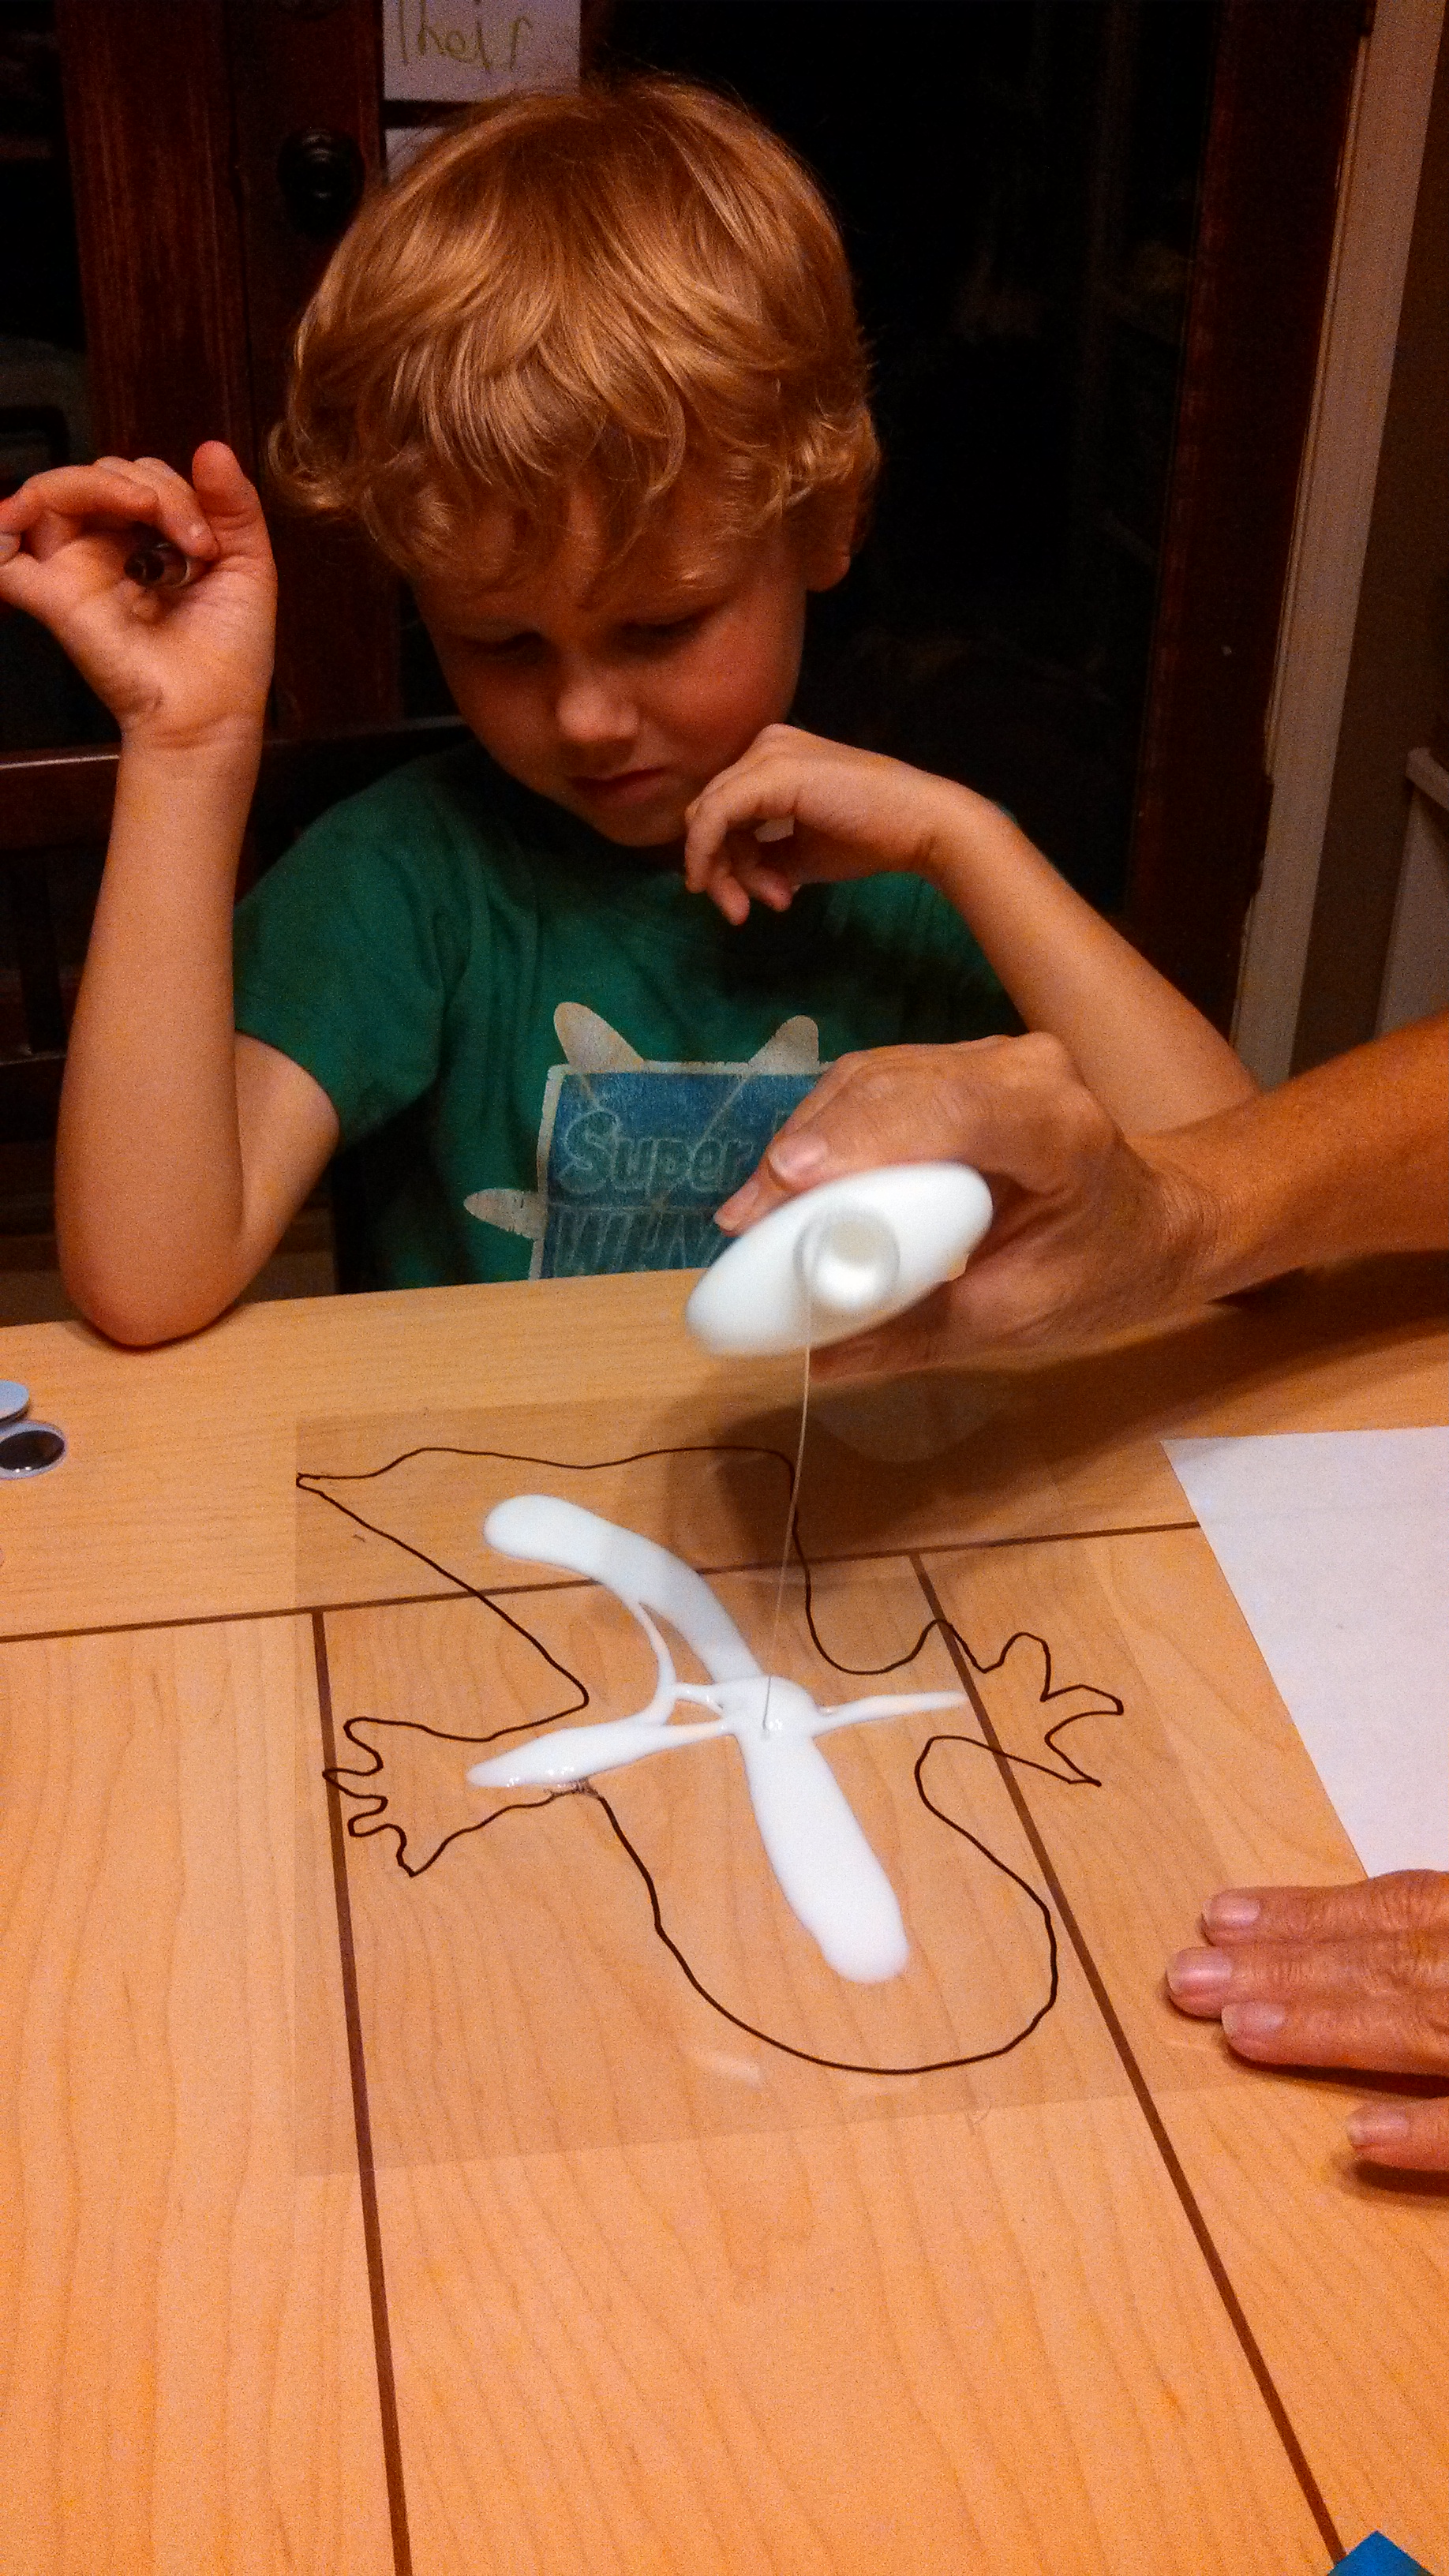
Step 4:  Place your transparencies on a flat surface to dry.  You will be finishing your craft tomorrow.  When all of your glue has turned from white to transparent, it is dry.  (We let ours sit for about 24 hours).

Step 5:  Using a small amount of glue, place googly eyes on your ghost.  Wait for the glue to dry.

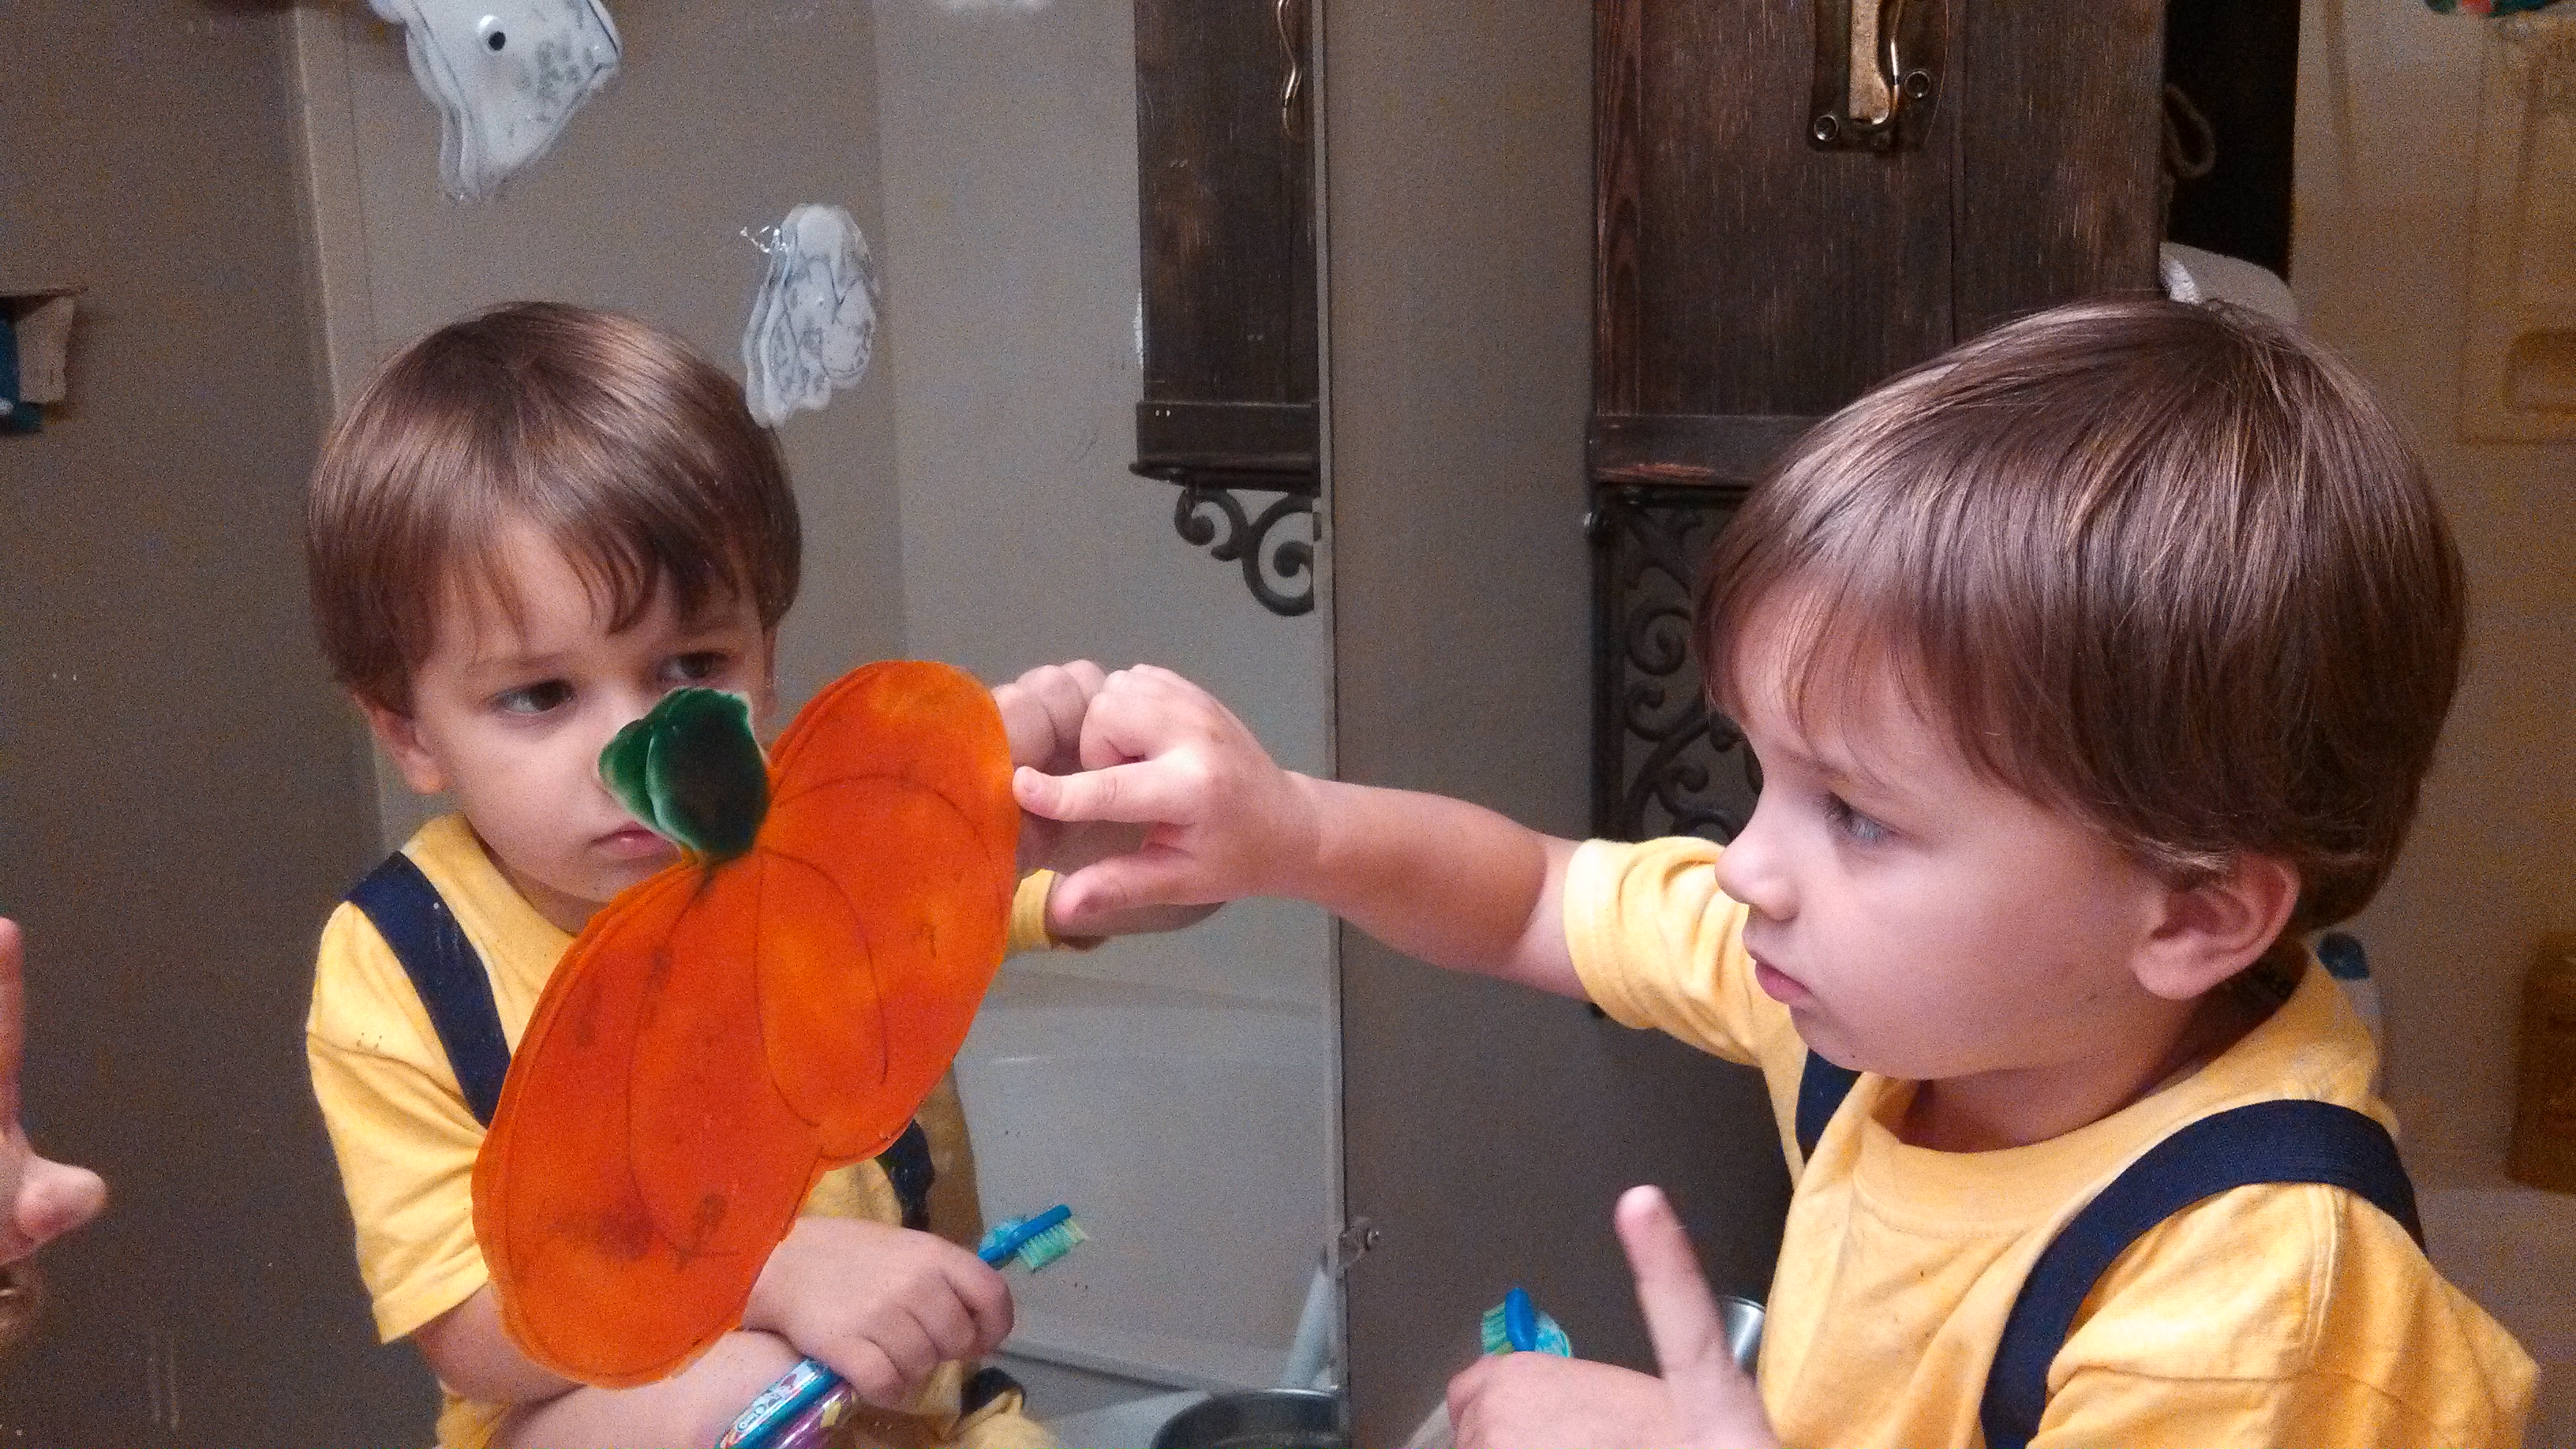
Step 6:  Peel off and stick to your window or mirror!  (Getting it started to peel off is the tricky part.  Try bending the transparency while using your finger nail to lift it from the sheet.  Then gently peel it off.)

IMG_20131012_203007_822

Step 7:  Use nail polish remover to erase the permanent marker from the transparencies and begin the craft all over again!

*To make COLOR decals, when doing Step 3, add a few drops of food coloring to your glue and mix together while you are spreading it.  For our pumpkins, we added 4 drops of yellow to 1 drop of red in the glue and mixed it together to make orange.

IMG_20131011_212046_150

Another option is to use fabric paints instead of glue, but 1. I love finger painting with glue, and 2. using glue is a cheaper alternative to fabric paint.

If you do this craft with your children, please post pictures to The Mommy Teacher Facebook page!

Blog Recommendation: “Just 30 Days”

I have to apologize to all the Mommy Teachers who were following my Daily Devotional posts!  As soon as my boys started Awana for the semester (a Christian Bible study for kids age 2 to grade 6.), our daily devotions were substituted by their memory verses for the week – every few lessons or so, they receive either patches or “jewels” for their club vests… very.big.deal.

So you can imagine, that while we were getting into the routine of working memory verses into our daily study, there was little self-control left inside of their little bodies for devotional time.  I am trying to work in a little craft or activity little by little, but so far, I have been left covered in glitter while they run around the house chasing each other.

As soon as we get our new schedule down, I will pick back up with writing the devotional posts so you can join us!  I will include our memory verses too.  Hopefully this is the week where we find our groove!

For now, I want to share with you my friend Megan’s new blog Just 30 Days (www.just30days.org).  When Megan first told me about her new blog adventure, I couldn’t wait to join her!  Each month, she is picking up a new habit to try for 30 days… one of those habits that you always WANT to try, maybe even make it your New Year’s Resolution, but never actually get around to it…

Read part of her “about me” section below:

We’ve all heard the saying that it takes just 30 days to create a habit. I wonder if that’s really true. I’ve decided to try and find out by taking 30 days to try one thing. Whether my goal is to wake up early, eat clean food, stop complaining, meet my neighbors, workout, encourage my husband, live on a budget…I’m going to try one thing at a time for 30 days straight. After 30 days, I will see if I want to keep doing it or maybe I will realize it doesn’t make my grass green at all. But either way, I believe there’s power in a focused life!

So this is my journey of watering my side of the grass…30 days at a time!

In September, she and her followers did 30 days of waking up early.  Phew, that was challenging for this night owl!  But the days that I did follow through were AMAZING!  Just being able to finish my quiet time without someone interrupting, taking a shower without the kids trying to hop in with me, and getting completely dressed with makeup on while being lost in my own thoughts instead of having to hear, “Mooooom!” completely changed my morning attitude!

This month, the challenge is praying for your children.  Each day, Megan has chosen a new virtue to pray about and she blogs about her prayer time, verses that accompany your prayer, and successes or little bumps along the way (because if it weren’t challenging to remember to do this every day, we’d already be doing it).

She also makes it super easy for you to join in the challenge.  Simply click the tab that says “The Next 30 Days” and fill out the contact information.  She will encourage you through e-mails and notifications of new posts.  What a great way to hold you accountable!

I have been praying over the kids each day and our experiences have been so peaceful!  As soon as I explained to the kids what I was going to be doing, they immediately sat down quietly to pray with me.  It has been amazing to see them sit still through my wordy prayers and then ask questions after about the virtue.

I hope you will join us in this challenge!!!  Perhaps my personal challenge next month should be staying on top of weekly devotional posts 😉

My 5 Favorite Dot Paint Activities

 “I want to paaaaaaaiiiinnt mom” was all I heard from my little Mckayla yesterday haha. I encouraged my little girl to re-phrase with “Mom, can we paint please?” and then of course we headed to the playroom (like 5 times yesterday). We hadn’t pulled out Dot Paint in a couple weeks so I thought it was time to re-visit it.  My kids treat the dot paint sticks like drumsticks sometimes and just bang on the table, but there are plenty of uses for this art experience.  So, I wanted to share some ideas with you. 🙂

[Click HERE to become a member for just $5 a month and get unlimited access to ALL The Mommy Teacher Printables!

OR CLICK HERE to purchase any one of these Bubble Letter Printables individually from my TeachersPayTeachers Store.]

There are definitely days when I simply put all different types of paper on the art table and just let my kids jump around from one new creation to the next.  Other days I use the printables I make specifically for these activities, and we focus on a few skills at a time.  Today I’m all over the place y’all haha so bare with me…  I felt like sharing my five favorite dot paint activities AND because one of those five activities involves using my home-made printables I am also going to share my five favorite dot paint printables!

5 great dot paint printables.001

So, my five favorite dot paint activities are:

1) Making faces using the dot paint on paper plates  – this can be a great tool for discussing emotions.

2) Decorating white paper bags (you can teach your little one to make a pattern around the edge of the bags).

3) Practicing Number Recognition with my Simple Number Search Download.

4) Decorating one of my calendar templates (practice one-to-one correspondence by marking only one square at a time with only one dot).

5) And number 5 of course is filling in any one of my FIVE Bubble Skill Printables!

I have an upper case alphabet, lower case alphabet, numbers 1-20, color words, and number words set.

Here is a glimpse for you:

Bubble Letter SS.002

And the momma in me “needs” to share the pictures of my kids in action:

Learning to Think: “What’s More Important?”

My kids often do things that are expectedly unexpected (if that even makes sense).  If I tell my kids to do something and they have a reaction that I didn’t anticipate, it is unexpected… but since it happens every single day a bajillion times a day… really… how unexpected can it be?  Expectedly unexpected.

Expectedly unexpect this, kids:  MY reaction to above situation.  I get annoyed.  Punish.  Yell.  Throw a Mommy hissy fit if it is the umpteenth time I have told them to turn off the TV.  Put the kids in timeout.  Take away the TV for the day.  Talk talk talk talk talk about how they disobeyed.  Seriously, you’d think they’d learn.  You think, I’d learn.

Well, I had this re-epiphany the other day.  A re-epiphany is that ‘aha’ moment that has been tucked away in our heads.  Sometimes we just need a little reminder.  And here is my re-epiphany… I need to teach my kids HOW TO THINK!

Pre-Re-Epiphany:

Me:  “It’s time to get dressed…”

Yet they continued to play with toys.

Me:  “C’mon boys, let’s get dressed.”

Nothing.

Me:  “Stop playing with toys and get dressed!”

Yeah, I’m not proud of those moments when I snap.  So, I have recently started turning the conversation around by verbally thinking about and questioning the situation to give them a chance to make the correct decision about what is the important thing to do to accomplish a task.

Post-Re-Epiphany

Me:  “It’s time to get dressed.”

They continue to play with toys.

Me:  “We need to get to school on time, so which is more important right now:  playing with toys or getting dressed?

Boys:  “Getting dressed.”

Me:  “What happens if we play with toys instead of getting dressed?”

Boys: “Then we are going to be late for school…”

and my little one added: “Then Mommy will be maaaaad.”

Yup… I guess I needed this little epiphany to get myself to chill out because fussing at my kids apparently sticks in their little minds.

I have been focusing my conversations with the kids on using guiding questions to help them discern how to behave.  The things that you and I as adults do automatically in our heads do not come naturally to young kids, but we can teach them the thought process that needs to be going through their minds.  We can verbally model that for them so they start doing it as well:

Is this the right thing to do?

Which is more important?

What would happen if I didn’t listen?

This type of teaching will help your kids learn how to think things through.  If you notice, I talked about our goal:  to get to school on time.  Then I narrowed down the field of all of the possible things they could be doing right now to two things:  playing with toys (the action they are doing) and getting dressed (the action I need them to be doing.

I then ask “What is more important right now?”  The right now is important because we do not want them to think that the things that matter most to them aren’t important, but at that exact moment, which is the MOST important.  With my 3-year-old, I sometimes also have to say, “We can play with our toys after homework today when it is play time,” to remind him that his own personal goal (to play with toys) will also be fulfilled, but at a later point today.

We have used this approach for many things this week – most of them have been in the format of prioritizing which activity will best help us to reach our goal.

Teaching how to think is cross-curricular.  You already teach foreshadowing (what’s going to happen next) in reading and math (sequencing) and cause and effect in science.  This is just taking the same conversational approach and applying it to behavior.

I recommend also having these conversations during regular play, not just when you need them to do something.  Expect the unexpected.  Try to anticipate how they might do something that you will have to fuss them for and start a conversation about it before it happens…

Mommy Teacher: “If we are going to play in your room which is next to your sleeping sister’s room, is it more important to talk loudly or quietly?”

Child:  “Quietly.”

Mommy Teacher:  “Why do we need to talk quietly?”

Child:  “Because we do not want to wake Sister up.”

And if you’re like me and have a little lawyer or politician on your hands who will try to argue his decision to choose to do something besides what you need him to do, just remind him to think about what is MOST important to accomplish the end goal.

Grandparents Day 2013

HEAD’S UP, MOMMY TEACHERS!  This Sunday is Grandparents Day!  My kids love their grandparents so much and wanted to make them a special gift for their big day!

My 4-month old niece, Marley Kate, recently sent me a cute letter and it inspired our Grandparents Day gifts.

IMG_20130904_112815_535-1 Since our printer is broken, I decided to hand paint ours, and leave a spot open for my niece, Abby, to stamp her foot, too.  This one below is on its way to Oklahoma right now.

IMG_20130903_141810_362-1 Then I thought it would be a great idea to make a few hand print art templates for you to purchase and download so your children can make beautiful art for their grandparents too!

In addition to a “You Are My Sunshine” template for your baby/toddler’s footprints, I have also made a “You Are o-FISH-ally My Favorite” template for a sideways hand print and an “Owl Always Love You” template for a palm hand print and thumbprints for wings.

IMG_20130904_111206_280-1 IMG_20130904_111215_378-1 These templates are available to download this week for just $1 for all 3!  Enjoy!

[purchase_link id=”4008″ style=”button” color=”blue” text=”Purchase”]

Happy Grandparents Day to all of you Grammy and Grampy Teachers out there!!!  Thank you for all that you do!  Your grandchildren love and appreciate you!


Related Posts Plugin for WordPress, Blogger...

1 4 5 6 7 8 20